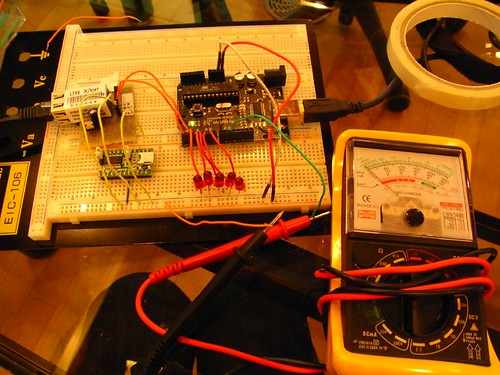
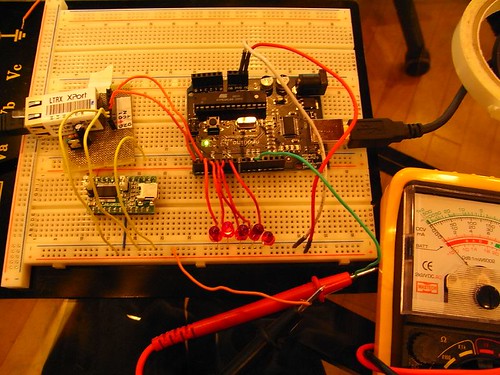
2008年7月4日金曜日

pong server

utano

第5章では1つのサーバーを介して
ピンポンゲームがプレイできるものを作ります。

今回の役割分担:

tmg:client1(3軸センサでシーソーインタラクションでピンポンする人)
stk:client2(感圧センサ×2で足踏みインタラクションでピンポンする人)
utn:server(サーバーのプログラムソースコード)

pong serverソースコード(Processing)

①サーバ用のPCを1台用意して、
 そのPCで上のソースコードをRunする。下のような画面が出ます。


②ピンポンしたい人(Client)は
 telnetでポート番号8080でサーバのIPアドレスへ接続。

☆サーバ(PC)のIPアドレスを調べるには
[ネットワーク接続]などからネットの接続状態を選べば出てくる。
 私は[ワイヤレス ネットワーク接続]を選んで[サポート]タブを出しました。
 
 
③するとこんな風になります。
 コマンドプロンプト側で"hi"と言ってくれます。
 Processing側では新しいClientが来た、と言い
 ピンポンフィールドにラケットが現れます。
 その入ってきたClientのIPもラケットの上に書いてあります。


④ちなみにコマンドプロンプト側でrを打つとラケットが右に、
 lを打つとラケットが左に移動します。xでサーバとの接続を中断します。

なので、キーボードだけで十分ピンポンが戦えます。
センサを使ってインタラクションでピンポンをするために
XPortでArduinoの値を送るところは次回。

2008年6月29日日曜日

yahooweather teruteru②

てるてるマイコンコードを色々いじってみる。

てるてるコードその1

てるてるコードその2

voltmeterが動かなくなったのですが

文字列の後にこの数値ひろえー命令をあれは出していて
サイトが時々更新されて
その文字列が無くなってしまう時があるようです。

文字列が復活したのでひとまず動きそうだ!
と思ってもう一度動作確認中なのですが
…またウェブから値がやってこない病が…

2008年6月28日土曜日

yahooweather teruteru

utano

てるてるリベンジ中。

yahoo news(英語)のお天気サイトから
お天気情報をひっぱって、
更に曇りなら1、晴れなら2、雨なら3にするというPHPを書きました。

これのソースコードを見ると、
本のp.131みたく <weather:1>とか出ます。

で、マイコン側のプログラムはほとんどそのままに、
このPHPを読んで<>内の数字を記憶して
その数字をintにして、
if文で1のときは曇りなので曇りLED光らせてねっていう
void teruteru()をつくりました。コンパイルは成功。
yahooweatherてるてるマイコンコード

でも光りませんでした。

たまにvoltmeterでもそうなのですが
ウェブを要求した後その内容を読み込んでくれない時が発生します。

うーむぅ。

しょうさまたすけて。

2008年6月27日金曜日

voltmeter完成

voltmeterが動きました!
このプロジェクトはアメリカの大気の汚染予報を教えてくれる、
AIRNowというサイトからNYの大気汚染度の現在情報を拾って
電流計メーター(アナログ)に出力させるというものです。
よく写真を見ると針が右にすこし振れています。


結局あの後いじったのは:
☆ルーターのIPを設定
(chapter3のp.84参照、ルータのIPアドレス調べ方)
☆ウェブから情報をはぎとるPHPのパーミッション変更
(Octalを707に、きょんちゃんアドバイス)

どれが果たして功を奏したのかw

全体像はこんな感じ:


あ、FT232Rのシリアル変換はさしっぱだっただけで無関係です。
LEDがナウシカのオームの目みたい…


2番目が光ってるのでHTTPrequest()してます。
情報を読み取るウェブ(PHP)を要求しているのです。
Arduinoの画面ではこんな感じ:

マイコンとXPortとウェブの三角関係②

本に沿って回路つくってコードを書くと、
ご丁寧に今どういう通信状態なのかをLEDで判断する事が出来ます。

でも大体サーバに接続しようとしてる所で
ピコピコ止まりだったので、
もう少し通信状態を可視化しようと思いました。

まずAcknowrichとshokai様から頂いたSocketClientで実験

XPort接続中。IPアドレスは192.168.0.150 ポート番号は50001に設定済。


ではSocketClientからXPortさんにアクセスしてみましょう


するとシリアル側(Acknowrich)ではI192.168.0.110と出る。


IはIncomeのIなので、情報が伝わった事はわかるけど
なんでIPアドレスが変わるんじゃ?
本でXPort設定のところでルーターのIPを指定する所あるけど
そこと関係があるんでしょうか??

まぁ一旦おいといて
シリアル側から、欲しいウェブがあるサーバに行ってねってお願いしてみる


…ただのテキスト扱いっぽいんですけど
GETとかHOSTも入れてみたけど同じ。

SocketClientを終了すると


ちゃんとDisconnectのDが現れる。

つながっているようでつながっていないような…
何が問題なんじゃー。

マイコンとXPortとウェブの三角関係①

utano

夜12時にDNPを訪れる!

てるてる坊主を作るにしても
とりあえず本にあるArduinoに書き込む、
ウェブを取り込むコードを理解しなければだめでしょう

ということで回路や本やら5時間くらいにらめっこして
ようやく本が書いてるコードが意図する所がつかめました。

マイコンで取ってきて欲しいウェブがあるサーバを呼ぶ
私の場合SFCなのでコマンドプロンプトでping web.sfc.keio.ac.jpを唱えて
SFCサーバのIPアドレスをゲットする。
そしてXPortに通じる呪文にする C133.27.4.40

接続が行われたらすかさずウェブを呼び出す
GET /~t05541ss/ほにゃほにゃ.php HTTP/1.0\n
HOST: web.sfc.keio.ac.jp

で、そのウェブのテキストをがーって読んで
その中から数字をゲットしてくる
その数字を更に数値にする(テキストのままだから)
あらかじめマイコンが読みやすい様に
そのウェブはPHPですっきりまとめてあります
HTMLタグ全部どけて、この文章の後に来る数字を表示してねって感じで。

で、その数値によってArduinoのoutputである電流計の触れ幅が変わる

っちゅうわけです。構造は分かるけど
XPort経由でウェブを問い合わせるのがなんかだめ。

ちゃんと動いているのか動作チェックする。

マイコンとXPortとウェブの三角関係②につづく。

TMGlogue


tmgです。肌荒れがひどいDEATH。最早荒野。

シーソー作ってます。廃材とガムテの芯。


回路さすがにちょっと難しくなってきたなぁ…!
本には電源arduinoの5Vから取れと書いてありますが、5Vだと電源足りひんよーと云われてしまうので、9Vからまわしています。とりあえず走ってるからいいか。うん。

ステッパー党の方は下のコードのreadSensorのあたりをいじくるようですね。
これからP163の下のほうの、Server領域に入ってみまーす。

p160までのarduino code

tmgです。
たまにはためになることを

今xportで、通信してピンポンをするシーソー作ってます。文字だけ見るとなんのこっちゃって感じですね。
p160までのコードです。エラーはないはず!
resetdeviceのくだりはまるっと無視しました。だってXportからそんなピンでてないんだもん…


----------------------

/*
pong cliant
Langage: Writing/Arduino

このプログラムはArduinoで、ネットワークにつながった
ピンポンのパドルをコントロールすることを可能にする

*/

//Lantronix deviceのステータスを定義する
#define disconnected 0
#define connected 1
#define connecting 2

//I/Oピンを定義する
#define connectButtonPin 2
#define rightLED 3
#define leftLED 4
#define connectionLED 5
#define connectButtonLED 6

int inByte= -1;
int status = disconnected;

byte connectButton = 0;
byte lastConnectButton = 0;

byte paddleMessage = 0;
byte connectMessage = 0;

void setup(){
pinMode(connectButtonPin,INPUT);
pinMode(rightLED,OUTPUT);
pinMode(leftLED,OUTPUT);
pinMode(connectionLED,OUTPUT);
pinMode(connectButtonLED,OUTPUT);

Serial.begin(9600);

}

void loop(){
readSensors();
setLeds();
stateCheck();
}

void readSensors(){
int leftThereshold = 500;//適宜
int rightThreshold = 420;//変えてね

int x = analogRead(0);
delay(10);

if (x > leftThereshold){
paddleMessage = 'l';
} else if (x > rightThreshold){
paddleMessage = 'r';
} else {
paddleMessage = 0;
}

connectButton = digitalRead(connectButtonPin);
connectMessage = 0;
if (connectButton == HIGH){
if (connectButton != lastConnectButton){
digitalWrite(connectButtonLED,HIGH);
connectMessage = 'x';
}
}
lastConnectButton = connectButton;
}

void setLeds(){
switch (paddleMessage){
case 'l':
digitalWrite(leftLED,HIGH);
digitalWrite(rightLED,LOW);
break;
case 'r':
digitalWrite(rightLED,HIGH);
digitalWrite(leftLED,LOW);
break;
case 0:
digitalWrite(leftLED,LOW);
digitalWrite(rightLED,LOW);
}

if (connectMessage !=0){
digitalWrite(connectButtonLED,HIGH);
}
else{
digitalWrite(connectButtonLED,LOW);
}

if (status == connected){
digitalWrite(connectionLED,HIGH);
}
else {
digitalWrite(connectionLED,LOW);
}
}

void stateCheck() {
switch (status){
case connected:
while (Serial.available() > 0){
if(Serial.read() == 'D'){
status = disconnected;
}
}
if (paddleMessage != 0) {
Serial.print(paddleMessage);
paddleMessage = 0;
}

if (connectMessage != 0){
Serial.print(connectMessage);
connectMessage = 0;
}
break;

case disconnected:
if (connectMessage !=0){
deviceConnect();
connectMessage = 0;
}
break;

case connecting:
if (Serial.available()){
inByte = Serial.read();
if (inByte == 'C'){
status = connected;
}
else{
deviceConnect();
}
}
break;
}
}

void deviceConnect() {
Serial.print("C192.168.0.182/50001\n\r");//←ここ自分のに変えてくださいね
status = connecting;
}

void blink(int howManyTimes){
for (int i=0; i< howManyTimes; i++) {
digitalWrite(connectButtonLED,HIGH);
delay(200);
digitalWrite(connectButtonLED,LOW);
delay(200);
}
}

ドライバ

とまごうです。
泰子さんが


ずっとできないできないと悩んでいたのだけど、
私たちが買ったFT232RLは、
WinXPではドライバーをインストールしないと使えないってしってた??

http://www.ftdichip.com/Drivers/VCP.htm
FT232RLのWinXP用のものをダウンロードして、ハードウェアの検
出ウィザードがでたらインストールしてあげましょう。

って取り扱い説明書に書いてあった。


って言ってたので↑、ダウンロードしたら出来ました!
しかし…上のドライバーをインストールしたら、今度はarduinoのほうを認識しなくなって仕舞いました。おろろーん
同社製品を何個もインストールしたからてんぱるのかしら?
わたしだけ?

とりあえずchap5はFT(ry使わなくてもいいっぽいんでアンインストール&インストールします。

2008年6月25日水曜日

てるてる坊主(途中)

o9no大先生の力によって
livedoorお天気のRSSから天気を表示するPHPが出来ました。
そこから更にマイコンが晴れとか雨とか読めるように
雨なら1、などの数字を割り当てるPHPを書きました。

問題はマイコンなのです。
XPortを通じて、
ライブドアお天気の天気を数字に」ファイルを呼び出して
ウェブの情報をだーって読んでっていう本に載ってるプログラムを
てるてる仕様に変えなきゃいけないんですが…

そもそもの電流計のやつも動いてくれないので
(でもなんかわかりそうな気もする)

雲行きがあやしくなってきました。

2008年6月23日月曜日

voltmeter

utano

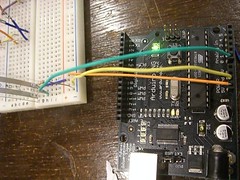
chapter4のvoltmeterのソースコードです。
一応コンパイルが通りました。
でも、void blink()のところがなんかきれいにブログで出なかったので
そこは本をみて調整してください。
つかHTMLタグとかがブログにアップするときにひっかかるので…

//Defines for the program's status (used for status variable):
#define disconnected 0
#define connecting 1
#define connected 2
#define requesting 3
#define reading 4
#define requestComplete 5

//Defines for I/O pins:

#define connectedLED 2 //indicates when there's a TCP connection
#define requestingLED 3 //indicates a HTTP request has been made
#define readingLED 4 //indicates a device is reading HTTP results
#define requestCompleteLED 5 //indicates a successful read
#define programResetLED 6 //indicates reset of Arduino
#define deviceResetPin 7 //resets Lantronix Device
#define meterPin 11 //controls VU meter; has to be one of thePWM pins 9-11

//Defines for voltmeter
#define meterMax 130 //max value on the meter
#define meterScale 150 //my meter reads 0-150

//variables
int inByte = -1; //incoming byte from serial RX
char inString[32]; //string for incoming serial data
int stringPos = 0; //string index counter

int status = 0; //Lantronix device's connection status
long lastCompletionTime = 0;//counter for delay after last completion

void setup(){
//set all status LED pins and Lantronix device reset pin:
pinMode(connectedLED, OUTPUT);
pinMode(requestingLED, OUTPUT);
pinMode(requestCompleteLED, OUTPUT);
pinMode(programResetLED, OUTPUT);
pinMode(deviceResetPin, OUTPUT);
pinMode(meterPin, OUTPUT);
//start serial port, 9600 8-N-1
Serial.begin(9600);
//reset Lantronix device
resetDevice();
//blink reset LED
blink(3);
}

//Take the Lantronix device's reset pin low to reset it
void resetDevice(){
digitalWrite(deviceResetPin, LOW);
delay(50);
digitalWrite(deviceResetPin, HIGH);
//pause to let Lantronix device boot up
delay(2000);
}

//Blink the reset LED
void blink(int howManyTimes){
int i;
for(i=0; i digitalWrite(programResetLED, HIGH);
delay(200);
digitalWrite(programResetLED, LOW);
delay(200);
}
}

void loop(){
stateCheck();
setLEDs();
}

void stateCheck(){
switch(status){
case disconnected:
//attempt to connect to the server
deviceConnect();
break;
case connecting:
//until you get a C, keep trying to connect: read the serial port
if(Serial.available()){
inByte = Serial.read();
if(inByte == 'C'){ //'C' in ASCII
status = connected;
}
else{
//if you got anything other than a C, try again
deviceConnect();
}
}
break;
case connected:
//send HTTP GET request for CGI script
httpRequest();
break;
case requesting:
lookForData();
break;
case reading:
readData();
break;
case requestComplete:
waitForNextRequest();
}
}

void deviceConnect(){
//send out the server address and wait for a "C"byte to come back.
//fill in your serves numerical address below
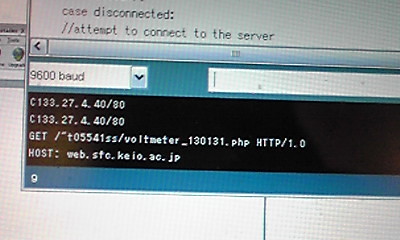
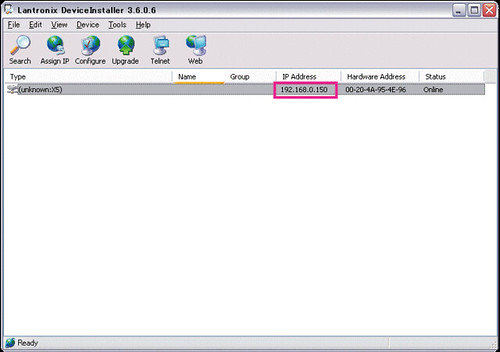
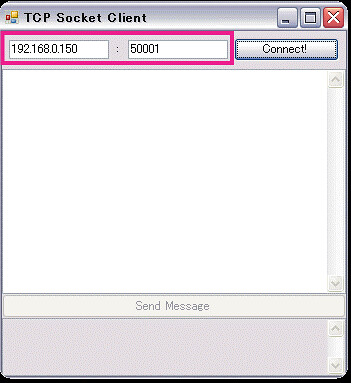
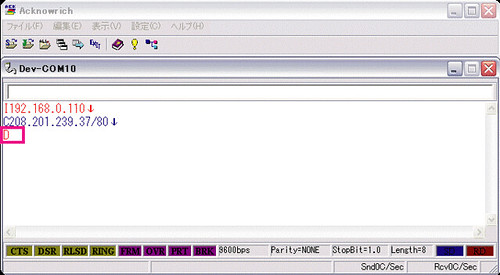
Serial.print("C192.168.0.150/80\n");
status = connecting;
}

void httpRequest(){
//make sure you've cleared the last byte from the last request
inByte = -1;
//reset the string position counter
stringPos = 0;
//make HTTP GET request and fill in the path to your version of the CGI script
Serial.print("GET /~t05541ss/public_html/voltmeter_130131.php HTTP/1.0\n");
//fill in your server's name
Serial.print("HOST:web.sfc.keio.ac.jp\n\n");
//update the state of the program
status = requesting;
}

void lookForData(){
//wait for bytes from server
if(Serial.available()){
inByte = Serial.read();
//if you get a "<", what follows is the air quality index. you need to read what follows "<"
if(inByte == '<'){
stringPos = 0;
status = reading;
}
}
}

void readData(){
if(Serial.available()){
inByte = Serial.read();
//keep reading until you get a ">"
if(inByte !='>'){
//save only ASCII numeric characters (ASCII 0-9)
if((inByte >= '0') && (inByte <= '9')){
inString[stringPos] = inByte;
stringPos++;
}
}
//if you get a ">" you've reached the end of the AQI reading
else{
interpretResults();
}
}
}

void interpretResults(){
//convert the string to a numeric value
int airQuality = atoi(inString);
//set the meter appropriately
setMeter(airQuality);
lastCompletionTime = millis();
status = requestComplete;
}

void setMeter(int desiredValue){
int airQualityValue = 0;
//if the value won't peg the meter, convert it to the meter scale and send it out
if(desiredValue <= meterScale){
airQualityValue = (desiredValue * meterMax/meterScale);
analogWrite(meterPin, airQualityValue);
}
}

void waitForNextRequest(){
if(millis() - lastCompletionTime >= 120000){
//reset Lantronix device before next request
resetDevice();
status = disconnected;
}
}

void setLEDs(){
/* Except for the disconnected and connecting states,
all the states of the program have corresponding LEDs.
so you can use a for-net loop to set them by turning them all off except for the one that has
the same number as the current program state
*/
for(int thisLED = 2; thisLED <= 5; thisLED++){
if(thisLED == status){
digitalWrite(thisLED, HIGH);
}
else{
digitalWrite(thisLED, LOW);
}
}
}


2008年6月19日木曜日

p.130 PHP

utano

p.130のPHPコードです。
ウェブのテキストだけ抽出する(HTMLタグどける)ものです。
こんなかんじ。

/* AIRNow Web Page Scraper
Language: PHP
*/

$readParticles = 0; //flag telling you the next time is the particle value
$particles = -1;

//Define variables
//url of the page with the air quality index data for New York City
$url = 'http://airnow.gov/index.cfm?action=airnow.showlocal&CityID=164';

//open the file at the url for reading;
$filePath = fopen($url, "r");

//as long as you haven't reached the end of the file:
while(!feof($filePath)){
//read one line at a time, and strip all HTML and PHP tags from the line
$line = fgetss($filePath, 4096);
echo $line;
}
//close the file at the URL , you're done
fclose($filePath);
?>


p.131と合体させたもの。
これはテキスト化したウェブから、
ある文字列が出たあとの後ろのテキストを抽出するコード。
こんなかんじ。

/* AIRNow Web Page Scraper
Language: PHP
*/

$readParticles = 0; //flag telling you the next time is the particle value
$particles = -1;

//Define variables
//url of the page with the air quality index data for New York City
$url = 'http://airnow.gov/index.cfm?action=airnow.showlocal&CityID=164';

//open the file at the url for reading;
$filePath = fopen($url, "r");

//as long as you haven't reached the end of the file:
while(!feof($filePath)){
//read one line at a time, and strip all HTML and PHP tags from the line
$line = fgetss($filePath, 4096);

if($readParticles == 1){
$particles = trim($line);
echo "";
$readParticles = 0;
}

if(preg_match('/AQI observed at /', $line)){
if($particles == -1){
$readParticles = 1;
}
}

}
//close the file at the URL , you're done
fclose($filePath);
?>

2008年6月18日水曜日

XPort

utano

XPortで回路を組みました。p.125まで終わりました。


Arduinoは電源をXPortに供給しています。
なので電池とかアダプタが無くてもつくれます。

本に書いてある回路ではブレッドボードに
三端子とかコンデンサとかがぶっささってますが
上の写真では既にXPortにドッキングさせたものを使っています。

Arduinoの5VとGNDをXPortのVCCとGNDにそれぞれつなぎ
XPortのOUTをFT232R USBシリアル変換のRXD、INをTXDにつなぐ。
シリアル変換のGNDとArduinoのGNDは共有してください。
またシリアル変換の電源はUSBケーブルでPCから供給するので
5Vにつなぐ必要性はありません。

つないだら、XPortの設定を行います。
LANケーブルを用意してください。

Making Things TalkではMicroというマイコンを使っているので
設定の仕方が異なります。
p.121-123の部分は以下の資料で設定を行いましょう。

XPort設定資料:
ismlog XPort①
ismlog XPort②

2008年6月14日土曜日

fwinkの設定

fwinkから画像がsfcサーバにアップできないという問題ですが解決しました。


fwinkの設定で、ftp serverは普通にccz00.sfc.keio.ac.jpとかでいいっぽい
次に画像を保存する先のフォルダ指定がだめでした

アカウントの直下のcatcamフォルダに保存したいので

~/public_html/catcam

とします。

本に書いてある/public_html/catcamだと
public_htmlがrootの直下にあるという意味になります。
実際sfcサーバはもうちょっとファイルの階層がありますので
指定した先がないよ~~ってなっちゃうのです。

ちなみにshokai様が教えてくれたトンネリングは実践したのですが
接続はできませんでした。なんでじゃー。
よくわかりませんが、通路をわざわざつくらなくても
FTPアクセスできるようになったんですかね??

cat is on the mat!

utano

tmgちゃんお疲れ☆
p.110の途中までしかやっていませんが
私はネコちゃんがマットにのってるよメールがきましたー!!!

p.109のコードのvoid setup()なのですが

void setup(){
//open a connection to the host:
client = new Client(this, "web.sfc.keio.ac.jp", 80);

//send the HTTP GET request
client.write("GET /~t05541ss/catcam/cat-script.php?sensorValue=321 HTTP/1.0\r\n");
client.write("HOST: web.sfc.keio.ac.jp\r\n\r\n");
//note that you've got a request in progress
requestInProgress = true;
}

上記のようにかくと動きました!
tmgさまのアカウントでそこ書き直してみたらいけるかなぁ??

TMGlogue

とまごー奮闘記!
Putting It All Togetherにて詰まりました

道程:
arduinoでプロセッシングの値を読む○

processingでセンサの値のグラフを表示する○

いやいやphpに入る 「トムは14歳です」○

CNSにてp107を確認○
--------------------------
んじゃぁprocessingとphp連携してみましょうかね!

まづp108のphp(自分仕様なのでコピペの際は変更してください)
       (書き込めなかったのでひらがなは適宜直してください)

$threshold = 320;
echo"<えいちtml><へead><ぼody>\n";
foreach($_REQUEST as $key => $value)
{
if ($key =="sensorValue"){
$sensorValue = $value;
}
}
if ($sensorValue > $threshold){
$messageString = "The cat is on the mat at http://web.sfc.keio.ac.jp/~s06643yt/catcam.";
echo $messageString;
send_mail(ゆかちっく[at]gmail.com,"the cat",$messageString);
}else{
echo "

the cat is not on the mat.

\n";
}
echo"\n";
end;
function send_mail($to,$subject,$message){
$from = "ゆかちっく[at]gmail.com";
mail($to, $subject,$message,"From: $from");
}
?>

つまり320以上の値を送ったらgmailにメールを送れってことですね!

そしてprocessing
import processing.net.*;
Client client;
boolean requestInProgress;
String responseString = "";
void setup()
{
client = new Client(this, "http://web.sfc.keio.ac.jp/~s06643yt",80);
client.write("GET /catcam/cat-script.php?sensorValue=321 HTTP/1.0\r\n");
client.write("HOST: http://web.sfc.keio.ac.jp/~s06643yt\r\n\r\n");
requestInProgress = true;
}
void draw()
{
if(client.available() > 0){
responseString +=char(client.read());
print("");
} else{ if(responseString.length() > 0){
if(requestInProgress == true){
println(responseString);
requestInProgress = false;
responseString = "";
}
}
}
}

つまり321という値をさっきのPHPに送れってことですね!
さあさRUN!

しかし待てども暮らせどもgmailとどきません…
ナニユエー!

sfcのFTPサーバってなんやー

utano

Putting it all together (p.108)まで終わっています。
ウェブカム画像をサーバにアップする(p.94-97)をやっていなかったので
本がwindowsユーザにおすすめするFwinkを使って始めました。

どこのサーバにあげるかとか色々設定するのですが
FTP Serverに何を入れたらいいかがわからない・・・

ccz00.sfc.keio.ac.jp
web.sfc.keio.ac.jp
sfc.keio.ac.jp

をベースにftp://やらftp.やらftp://ftp.やら
/~t05541ss(あかうんと)やら

あらゆる組み合わせを試しているのですが接続できませんエラーが出ます。

ウェブカムに異常はなさそうです。

かれこれ1時間ちょっとこの状態なので
とりあえずお風呂にはいって最後のProcessingを書きます。

2008年6月12日木曜日

センサ値をグラフ表示

utano

tmg様ごめんなさい、
一個の前の記事のコードではまだグラフは描けないのです…

p.102-103のRefine Itのコードを書き足さないといけないのです。
これならいけるはず:

import processing.serial.*;

int linefeed = 10;//linefeed in ASCII
Serial myPort;//the serial port
int sensorValue = 0;//the value from the sensor

int graphPosition = 0;//the horizontal position of the latest line to be drawn on the graph

void setup(){
size(400,300);
//list all the available serial ports
println(Serial.list());
myPort = new Serial(this, Serial.list()[1], 9600);
myPort.bufferUntil(linefeed);
}

void draw(){
//twiddle your thumbs
}

void serialEvent(Serial myPort){
//read the serial buffer
String myString = myPort.readStringUntil(linefeed);
//if you got any bytes other than the linefeed
if(myString != null){
//trim off the carriage return and convert the string to an integer
sensorValue = int(trim(myString));
//print it
println(sensorValue);
drawGraph();
}
}

void drawGraph(){
//adjust this formula so that lineHeight
//is always less than the height of the window
int lineHeight = sensorValue /2;

//draw the line
stroke(0,0,255);
line(graphPosition, height, graphPosition, height-lineHeight);

//at the edge of the screen, go back to the beginning
if(graphPosition >= width){
graphPosition = 0;
background(0);
}
else{
graphPosition++;
}
}

2008年6月11日水曜日

TMGlogue

とまごー今日やったよ・わかったよ・わからなかったよ

○最初のネットワークについてを読んだ

○PHP…混乱してきた・先に回路組もうか

○回路…今回は簡単じゃん^^

○arduinoでセンサの値を読む…できた

○P101のTest it…書いてみた、が動かない
 しのさまのソースをコピーしたが、エラーはないもののグラフ出ず

???今日は時間なのでこのへんで去ります…orz
明日ミート後にもちょいやります。

感圧センサが反応したよ

utano

stk氏とコラボレーションしてp.102まで終わりました。


感圧センサ動いた~♪
ジャンプワイヤが虹みたいでかわいいでしょ。

p.101のArduinoコード:

/* Analog sensor reader
Language: Arduino

Reads an analog input on Analog in 0, prints the result as an ASCII-formatted decimal value.

Connections:
FSR analog sensors on Analog in 0
*/

int sensorValue;//outgoing ADC value

void setup(){
//start serial port at 9600bps
Serial.begin(9600);
}

void loop(){
//read analog input
sensorValue = analogRead(0);
//send analog value out in ASCII decimal format
Serial.println(sensorValue, DEC);
//wait 10ms for next reading
delay(10);
}


p.101-102のProcessingコード:

import processing.serial.*;

int linefeed = 10;//linefeed in ASCII
Serial myPort;//the serial port
int sensorValue = 0;//the value from the sensor

void setup(){
size(400,300);
//list all the available serial ports
println(Serial.list());
myPort = new Serial(this, Serial.list()[1], 9600);
myPort.bufferUntil(linefeed);
}

void draw(){
//twiddle your thumbs
}

void serialEvent(Serial myPort){
//read the serial buffer
String myString = myPort.readStringUntil(linefeed);
//if you got any bytes other than the linefeed
if(myString != null){
//trim off the carriage return and convert the string to an integer
sensorValue = int(trim(myString));
//print it
println(sensorValue);
}
}

chapter3 準備するもの

utano

STKさんと同じところまできてます。
まだマットできてなくてすみません。

以下、chapter3で必要なものリストの原稿(blog)ですので
目を通しておいてください。

特にYSKさんmacに関すること補足情報が欲しいです。

******************************************

chapter2もまだ終わっていないのにもう次の話か!
って感じですが、chapter3を行うまでに以下準備お願いします。

chapter3ではPHPという言語でプログラムを書きます。

☆テキストエディタ(好きなものを落としてください)

windowsユーザの方は:

PHP editor
スーパープログラマー翔さまのおすすめPHPエディタ

xyzzy
一番上のxyzzyリンクをクリック
私が2春の時プロ入で使用したテキストエディタで、一応書けました

macユーザの方は:

mac OS Xには最初から「テキストエディット」という
テキストエディタが搭載されています。他にもありますけどね。

mi
グーグルさんで検索すると出てきましたw

☆command lineでリモートアクセスできるソフトウェア

windowsユーザの方は:

PuTTY
A Windows installer for everything except PuTTYtelと文の下の
putty-0.60-installer.exeをダウンロードしましょう。

macユーザの方は:

Terminalというものが[Applications]⇒[utilities]の中にあります。
そこでsshというコマンド入力をすると使えます。

☆ウェブカム

安いものは500円くらいから秋葉原で買えます。


macユーザの方へ:

macユーザの方は普通のUSBカメラを使うためにドライバを入れましょう。
macamというドライバです。
インストール後macamの中にあるmacam.componentというファイルを
ハードディスクの[ライブラリ]⇒[Quicktime]ディレクトリに入れましょう。
/Library/Quicktime/macam.component って。
そうするとウェブカムを使うソフトウェアで、
ちゃんとウェブカムが認識されるようになります。

☆ウェブカムの画像を取り込むソフトウェア

googleで調べると色々でてきますが、本がお勧めしているのは

windowsユーザの方は:

fwink

macユーザの方は:

Evocam
シェアウェアなので有料なんですね、これが…

☆感圧センサ

ツクモロボット王国で売っています。一つあたり2600円くらいします。
でも8個まとめ買いすると一人あたり2060円になります!

2008年6月10日火曜日

初めてのPHP

一応P91の下のプログラムができたっぽいです。

プログラムによるとif文の判定から僕はまだお酒を飲んではいけないらしいのですが
どの値から結果を出しているのですかね?

あとP90の下にあるプログラムもよく分からないです。
こんな感じです。

あとコマンドライン(putty?)関係が一切分かりません。
英文をしっかり読まないといけないみたいです、頑張ります。

2008年6月9日月曜日

mymr_chapter2

宮村です

遅ればせながらというか、今更なのですが、Monsky Pongがやっと正常に動いてくれました。Proce55ing
の方で、

error, disabling serialEvent() for //./COM7
java.lang.reflect.InvocationTargetException
at sun.reflect.NativeMethodAccessorImpl.invoke0(Native Method)

というエラーが出たままずっと直らなかったのですが、コードを最初から書き直したり、昔のバージョンで実行したりしていたらできました。
大分遅れてしまいましたが、急いでChapter3に取り掛かります。

mymr !!

2008年6月6日金曜日

途中経過

やすこ

今日はP108まで終わりました。
PHP書いて、sensorValueの値によって、メッセージが変わったり、メールが送られてくるものです。

こんな味気ない画面ですがw
http://web.sfc.keio.ac.jp/~s05434ys/catcam/cat-script.php?sensorValue=330このアドレスの330の値を12とか適当な値に変えてみてください。
※thresholdは320です。

次はProcessingとの連携だ!

PHP

utano

ワタシの課題:
p.30-31のcommand lineはやっぱりわからん
p.92-93でtelnet smtp.example.com 25で接続エラー出る

ソースコードを貼り付けようとしたのですが
HTMLを含んでいるのでエラーが出てしまい貼れませんでした。

では寝ます。

2008年6月5日木曜日

phpについて

utano

作業が遅いです、すみません。

一つ提案ですがこれから進行にズレが生じてくると思うので
投稿した記事のタグにchapter3など章のタグを付けませんか??

今PuTTYを使ってcommand lineに書き込んだりしています。

p.89終わりにChapter1で書いたPHPを
command lineから呼び出そうという所で戸惑っています。

p.30-31を見ながらPHPファイルを作って
学校アカウントのpublic_htmlディレクトリに上げました。

php hello.php
で本来command lineからファイルを呼び寄せる事が出来るのですが
php: Command not found.
といわれます。

さかのぼってPHPのバージョンを調べるために
php -vを入力しても同じ結果が出ました。

????

ちなみにウェブブラウザからは確認が出来ました

今日はここまで。明日とりあえずすっ飛ばして(いけるのか?)先を見ます。

2008年6月4日水曜日

CatCam途中経過

やすこ

とりあえずp106までソースの写経が終わったので貼付け。Thresholdで、いっこ前の値といまとって来た値がどのくらい違うかでネコが来たかどうか判断します。いわゆる差分ってやつですね。

エラーはないんだけど、動作の確認はしてないからあんまり信用しないでください。
明日には秋葉原いってきますよ〜

import processing.serial.*;

int graphPosition = 0;
int linefeed = 10;
Serial myPort;
int sensorValue = 0;


int prevSensorValue;
boolean catOnMat = false;
int threshold = 320;//閾値のこと

int timeThreshold = 1;
int timeLastSent[] = {
hour(), minute() - 1
};

void setup(){
size(400,300);
println(Serial.list());

myPort = new Serial(this, Serial.list()[0],9600);

myPort.bufferUntil(linefeed);

}

void draw(){
if (sensorValue > threshold){
if (prevSensorValue <= threshold){
delay(100);//読み込みを減らすことで誤差をなくす
catOnMat = true;
sendMail();
}
}else{
if (prevSensorValue >= threshold){
catOnMat = false;
}

}
prevSensorValue = sensorValue;

}

void serialEvent(Serial myPort){

String myString = myPort.readStringUntil(linefeed);

if (myString != null){

sensorValue = int(trim(myString));


println(sensorValue);
drawGraph();
}
}

void drawGraph(){


int lineHeight = sensorValue/2;
if(catOnMat){
stroke(0,255,0);
}else{
stroke(255,0,0);
}

line(graphPosition, height, graphPosition, height - lineHeight);

if(graphPosition >= width){
graphPosition = 0;
background(0);
}else{
graphPosition++;
}

}

void sendMail(){
int[] presentTime = {hour(), minute()};
print(sensorValue + "\t");
print(presentTime[0] + ":" + presentTime[1] + "\t");
println(timeLastSent[0] + ":" + timeLastSent[1]);

if(presentTime[0] == timeLastSent[0]){
if(presentTime[1] - timeLastSent[1] >= timeThreshold){
timeLastSent[0] = hour();
timeLastSent[1] = minute();
}

}

if(presentTime[0] != timeLastSent[0]){
int minuteDifference = (60 - timeLastSent[1]) + presentTime[1];

if(minuteDifference >= timeThreshold){
println("This is where you'd send a mail.");

timeLastSent[0] = hour();
timeLastSent[1] = minute();
}
}
}

とりあえず

とりあえずコピペながら完成することができました!
(ほとんどArduinoに踊らされていただけなのですが…)

全てはやすこさん、しのさんのプログラムのおかげです

ものすごい苦労したのにも関わらず
完成したモノのシュールさはなんとも言えないものがあります。。

これからFlow Controlを試したりプログラムを理解したり
3章も少しづつやっていきたいです。


2008年6月3日火曜日

TMGlogue

SHIN☆CYOKU
どうやら
値を読んでいるらしいarduino
通信してるらしいprocessing
でもパドルは動かないッ!
ただのコピペなのでちゃんと読んで見まーす

Flow Control

やすこ

第3章の進捗としては、P103まで終了。
とはいえArduinoがないので、書き込んでおらず、センサもないのでうまくいってるか疑問。とりあえずソースだけ完成させる作戦です。

しの様のArduinoへの書き込みと連動して、Flow Controlを行ったProce55ingソースも載せときます。
※これはNow you can play Monski Pongのソースとは違います!!まだArduinoへ新しいソースを書き込んでいない人は、さたけの日記へのコメントを参照してください。

import processing.serial.*;
//myPort(任意名)というオブジェクトを用意
Serial myPort;

int linefeed = 10;
float leftPaddle, rightPaddle;
int resetButton, serveButton;
int leftPaddleX, rightPaddleX;
int paddleHeight = 50;
int paddleWidth = 10;

float leftMinimum = 200;//ここは自分のセンサーの値にする
float rightMinimum = 250;
float leftMaximum = 450;
float rightMaximum = 600;

int ballSize = 10;
int xDirection = 1;
int yDirection = 1;

int xPos, yPos;

boolean ballInMotion = false;
int leftScore = 0;
int rightScore = 0;

PFont myFont;
int fontSize = 36;

boolean madeContact = false;

void setup(){

size(640, 480);

xPos = width/2;
yPos = height/2;

println(Serial.list());

myPort = new Serial(this, Serial.list()[0], 9600);

myPort.bufferUntil(linefeed);

leftPaddle = height/2;
rightPaddle = height/2;
resetButton = 0;
serveButton = 0;

leftPaddleX = 50;
rightPaddleX = width - 50;

noStroke();

PFont myFont = createFont(PFont.list()[2], fontSize);
textFont(myFont);
}

void draw(){

if (madeContact == false){
myPort.write('\r');
}
background(0);

rect(leftPaddleX, leftPaddle, paddleWidth, paddleHeight);
rect(rightPaddleX, rightPaddle, paddleWidth, paddleHeight);

if (ballInMotion == true){
animateBall();
}
if (serveButton == 1){
ballInMotion = true;

}
if (resetButton == 1){
leftScore = 0;
rightScore =0;
ballInMotion = true;
}
text(leftScore, fontSize, fontSize);
text(rightScore, width-fontSize, fontSize);
}


void serialEvent(Serial myPort){

madeContact = true;

String myString = myPort.readStringUntil(linefeed);

if (myString != null){

myString = trim(myString);

int sensors[] = int (split(myString, ','));

if(sensors.length ==4){

float leftRange = leftMaximum - leftMinimum;
float rightRange = rightMaximum - rightMinimum;


leftPaddle = height * (sensors[0] - leftMinimum)/leftRange;
rightPaddle = height * (sensors[1] - rightMinimum)/rightRange;

resetButton = sensors[2];
serveButton = sensors[3];

print("left:"+leftPaddle + "\tright:"+rightPaddle);
println("\treset:"+resetButton+"\tserve:"+serveButton);

myPort.write('\r');
}
}
}

void animateBall(){
if (xDirection < 0){
if ((xPos <= leftPaddleX)){
if((leftPaddle - (paddleHeight/2) <= yPos)&&
(yPos <= leftPaddle + (paddleHeight/2))){
xDirection =-xDirection;
}
}
}
else {
if ((xPos >= (rightPaddleX + ballSize/2))){
if((rightPaddle - (paddleHeight/2) <=yPos)&&
(yPos <= rightPaddle + (paddleHeight/2))){
xDirection =-xDirection;
}
}
}
if (xPos <0){
rightScore++;
resetBall();
}
if (xPos > width){
leftScore++;
resetBall();
}
if ((yPos - ballSize/2 <= 0) || (yPos +ballSize/2 >= height)){
yDirection = -yDirection;
}

xPos = xPos + xDirection;
yPos = yPos + yDirection;

rect(xPos,yPos, ballSize, ballSize);

}

void resetBall(){
xPos = width/2;
yPos = height/2;
}

2008年6月2日月曜日

もう限界

しのさんが書いてくれてたprocessingのコードを実行すると
最後の部分の

void resetBall(){
//put the ball back in center
xPos = width/2;
yPos = height/2;
}

というコードがunexpected tokenというエラーになってしまいます。
他人のコピペではなく自分でやれということでしょうか。

そしてArduinoの方も高確率で読み込み中に固まります。

そんな感じで今日は休講にもかかわらず学校へ来たのに
何もできず踏んだり蹴ったりでございました。

2008年6月1日日曜日

p.69 Arduino

utano

スイッチの回路が間違っていたのを修正したら
ちゃんとボタン操作が出来るようになりました。
ようやく完成です♪
教えられる様にまたコードを見ておきます。

さてp.69に、p.59で書いたArduinoプログラムをいじり直す箇所があります。
wrap the whole of the loop() method in an if() statement like this:
という英語を解釈すると、以下の赤い文字を足すという作業になると思います。

int leftSensor = 0;
int rightSensor = 1;
int resetButton = 2;//この数字がpinModeでの値になります
int serveButton = 3;//こっちも上と同じ

int leftValue = 0;
int rightValue = 0;
int reset = 0;
int serve = 0;

void setup(){
Serial.begin(9600);
pinMode(resetButton, INPUT);//int resetButton = 2;としたので、2ピンにボタンをつけます
pinMode(serveButton, INPUT);//同じく
}

void loop(){

//check to see whether there is a byte available to read in the serial buffer
if(Serial.available() > 0){

//read the serial buffer, you don't care about the value of the incoming byte
//just that one was sent
int inByte = Serial.read();

//the rest of the existing main loop()

leftValue = analogRead(leftSensor);//ピン番号は、Buttonの時と同じ。最初のint leftSensor指定の0
rightValue = analogRead(rightSensor);//上と同じ理由で1
reset = digitalRead(resetButton);//上と同じ
serve = digitalRead(serveButton);//上と同じ

Serial.print(leftValue, DEC);
Serial.print(",");
Serial.print(rightValue, DEC);
Serial.print(",");
Serial.print(reset, DEC);
Serial.print(",");
Serial.println(serve, DEC);
}
}

TMGlogue

本日の進捗
とりあえずくまを緊縛上等してみた
おけつがキュートです!!ww
回路組みなおしてarduinoコンパイルったらあっさり上手くいきました!
調子に乗ってすこやか泰子さんのソースも
プロセッシングでやってみたら
どうやら認識しておるようです
たのしくなってきたにまにまにま!!!
今日は時間切れになってまったので、ピンポンゲームは明日にとっておきたいと思います。

Now you can play Monski pong

utano

p.68のNow you can play Monski pong!までのソースコードです。
小さいボールを四角で跳ね返すピンポンゲームみたいになります。
でもなんか反応わるい時もあるので合ってるか自信ないです。

import processing.serial.*;//import the Processing serial library

int linefeed = 10;//Linefeed in ASCII
Serial myPort;//シリアルポートの名前をmyPortにする宣言

float leftPaddle, rightPaddle;
int resetButton, serveButton;
int leftPaddleX, rightPaddleX;
int paddleHeight = 50;
int paddleWidth = 50;

//センサの最大値と最小値
float leftMinimum = 250;
float rightMinimum = 270;
float leftMaximum = 540;
float rightMaximum = 530;

//ボールを足す
int ballSize = 10;
int xDirection = 1;//horinzontal direction ひだり-1 みぎ1
int yDirection = 1;//vertical direction うえ-1 した1
int xPos, yPos;//ボールのx,y座標

boolean ballInMotion = false; //whether the ball should be moving
int leftScore = 0;
int rightScore = 0;

PFont myFont;
int fontSize = 36;

void setup(){
//ウィンドウサイズ
size(640,480);
//ボールをスクリーンの真ん中にもってくる=幅の2分の1の座標指定
xPos = width/2;
yPos = height/2;

//使えるシリアルポートをリストにして挙げる
println(Serial.list());
//Arduinoをつなげているシリアルポートナンバーがあてられているリストの番号を[]に入れてmyPortとする
myPort = new Serial(this, Serial.list()[1], 9600);
//read bytes into a buffer until you get a linefeed (ASCII,10);
myPort.bufferUntil(linefeed);

//initialize the sensor values
leftPaddle = height/2;
rightPaddle = height/2;
resetButton = 0;
serveButton = 0;

//initialize the horizontal paddle positions
leftPaddleX = 50;
rightPaddleX = width - 50;

noStroke();

//create a font with the third font available to the system
PFont myFont = createFont(PFont.list()[2], fontSize);
textFont(myFont);
}

void draw(){
background(0);
//draw the left paddle
rect(leftPaddleX, leftPaddle, paddleWidth, paddleHeight);

//draw the right paddle
rect(rightPaddleX, rightPaddle, paddleWidth, paddleHeight);

//calculate the ball's position and draw it
if(ballInMotion == true){
animateBall();
}

// if the serve button is pressed, start the ball moving
if(serveButton == 1){
ballInMotion = true;
}

//if the reset button is pressed, reset the scores and start the ball moving
if(resetButton == 1){
leftScore = 0;
rightScore = 0;
ballInMotion = true;
}

//print the scores
text(leftScore, fontSize, fontSize);
text(rightScore, width-fontSize, fontSize);
}


//serialEvent メソッドがバッファがsetup()で行った、
//bufferUntil()によって設定された値になると
//自動的にProcessing Sketchによって発動する(意味不明だ)

void serialEvent(Serial myPort){
//read the serial buffer
String myString = myPort.readStringUntil(linefeed);

//if you got any bytes other than the linefeed
if(myString !=null){
myString = trim(myString);

//カンマのところでstringを区切り、それらを整数に変える
int sensors[] = int(split(myString, ','));
//if you received all the sensor strings, use them
if(sensors.length ==4){
//calculate the flex sensors' ranges
float leftRange = leftMaximum - leftMinimum;
float rightRange = rightMaximum - rightMinimum;

//scale the flex sensors' results to the paddles' range
leftPaddle = height * (sensors[0]-leftMinimum)/leftRange;
rightPaddle = height * (sensors[1]-rightMinimum)/rightRange;

//assign the switches' values to the button variables
resetButton = sensors[2];
serveButton = sensors[3];

//print the sensor values
print("left:" + leftPaddle + "\tright:" + rightPaddle);
println("\treset:"+ resetButton + "\tserve:"+ serveButton);
}
}
}

void animateBall(){
//if the ball is moving left
if(xDirection < xdirection =" -xDirection;">= (rightPaddleX + ballSize/2))){
//if the ball is in between the top and bottom of the right paddle
if((rightPaddle - (paddleHeight/2) <= yPos) && (yPos <= rightPaddle + (paddleHeight/2))){ //reverse the horizontal direction: xDirection = -xDirection; } } } // if the ball goes off the screen left if(xPos <> width){
leftScore++;
resetBall();
}
//stop the bal going off the top or the bottom ofthe screen;
if((yPos - ballSize/2 <= 0)||(yPos + ballSize/2 >= height)){
//reverse the y direction of the ball
yDirection = -yDirection;
}
//update the ball position
xPos = xPos + xDirection;
yPos = yPos + yDirection;


//Draw the ball
rect(xPos, yPos, ballSize, ballSize);
}

void resetBall(){
//put the ball back in center
xPos = width/2;
yPos = height/2;
}

Processing + Arduino

とりあえず一番最初のProcessing+Arduinoのコード

お試し用に是非!

import processing.serial.*;
//myPort(任意名)というオブジェクトを用意
Serial myPort;

int linefeed = 10;

void setup(){

println(Serial.list());

myPort = new Serial(this, Serial.list()[0], 9600);

myPort.bufferUntil(linefeed);

}

void draw(){

}


void serialEvent(Serial myPort){

String myString = myPort.readStringUntil(linefeed);

if (myString != null){

myString = trim(myString);

int sensors[] = int (split(myString, ','));

for (int sensorNum = 0; sensorNum < sensors.length; sensorNum++){
print("Sensor"+ sensorNum +":"+ sensors[sensorNum] + "\t");
}
println();
}
}


※以下、Macの人用に
最初にこのコードを書き込んでも、上手くシリアル通信できませんでした。
一番最初のimport processing.serial.*;が上手くうごいてくれなかった??
そんな人は
Sketch>Import library>serial
で最初の一行を自動で書いてくれるので、その下にプログラムを書いて行くと上手くいくみたい。

※※MTTには、MacユーザーはIOを使う前にセットアップをする必要があると書いてありますが、ProcessingのVes0134からは必要なくなったとProcessing.orgに書いてありました。よかったね☆

2008年5月28日水曜日

Processingかいています

utanoです。
とりあえず64ページまで作りこみました。

最初に書いたコードをちょこちょこいじっていくという形で本は進みます。
で、ちなみに本の後ろのAppendix Cに
コードが全文きれいにもう書かれた状態のものがあります。
そのなかで、設定で気をつけるといいかなぁと思った事を書きます。
もぅ分かりきってたらすみません。

Processingコード書くときのsetup()の中で:

println(Serial.list());
//シリアルポートを全部リストアップする

myPort = new Serial(this, Serial.list()[1], 9600);println(Serial.list());
//Arduinoをつなげているシリアルポートナンバーがあてられているリストの番号を[]に入れてmyPortとする

myPort.bufferUntil(linefeed);

となっていると思います。
全部コード書き終えて実行してみると、Serial.list()によりポートのリストアップを行います。
で、下の黒い部分に

[0]COM3
[1]COM4

とか表示されます。これはパソコンのポートを挙げてくれているのです。
で、自分がArduinoを挿しているシリアルの番号が例えばCOM4だったら、
リストにあるようにCOM4は[1]だったので

myPort = new Serial(this, Serial.list()[1], 9600);println(Serial.list());

[ ]内に1を入れるということになっています。

はい、茶番でしたー。ひきつづき頑張ります。

TMGlogue

とまごうです!
取り敢えず今日やったことをたらたら書きます! 部屋で寝てたくまを引っ張って来てやった!
手は短いが結構でっかいので没問題!

回路図見て組んでみる ジャンパー線がひどい事になっているッ!
最早密林!でも気にしないッ!


泰子さんのコードを写経してみる!
どきどきしながらコンパイル~

…アレ?

なんか数字が出てこないよ??変な文字になっちゃうよ??

直そうと思ったけど結局分からないので明日またやりますorz

出来ました

やすこです。連続投稿。

書き込んだソースはこんな感じ


int leftSensor = 0;
int rightSensor = 1;
int resetButton = 2;//この数字がpinModeでの値になります
int serveButton = 3;//こっちも上と同じ

int leftValue = 0;
int rightValue = 0;
int reset = 0;
int serve = 0;

void setup(){
Serial.begin(9600);
pinMode(resetButton, INPUT);//int resetButton = 2;としたので、2ピンにボタンをつけます
pinMode(serveButton, INPUT);//同じく
}

void loop(){
leftValue = analogRead(leftSensor);//ピン番号は、Buttonの時と同じ。最初のint leftSensor指定の0
rightValue = analogRead(rightSensor);//上と同じ理由で1

reset = digitalRead(resetButton);//上と同じ
serve = digitalRead(serveButton);//上と同じ

Serial.print(leftValue, DEC);
Serial.print(",");
Serial.print(rightValue, DEC);
Serial.print(",");
Serial.print(reset, DEC);
Serial.print(",");
Serial.println(serve, DEC);

}


これを書き込んだあと、Serial Monitorで見てみるとこんな感じ


曲げると値が10~50くらい変動します。いまからprocessingのソースコードに取りかかります。

今日のArduino

やすこ

お家でほそぼそとArduino
ひさしぶりだからちょっと忘れてたけどtoolでcomの指定をしてあげてね。そうしないと書き込めません。

Macの場合はこんな感じ。
Winの場合はcomの確認をしてください。ちょっと面倒だけどね。

書き込みのテスト用にどうぞ。

int LEDPin =13;

void setup(){
pinMode(LEDPin, OUTPUT);
}

void loop(){

digitalWrite(LEDPin, HIGH);
delay(500);
digitalWrite(LEDPin, LOW);
delay(500);
}

LEDのプラスを13pinマイナスをGNDに指す。すると点滅するっていうものです。

※書き込みのコツ
Upload to IOをPCで押してから、Arduinoのリセットボタンを押します。
普通逆だけど、Arduinoの場合、こっちのほうが上手く行くらしいw

おなじみのs.h.logを参考に!

2008年5月26日月曜日

5月26日の成果

やすこ

今日はMonski Pongの回路を読みながらもくもくと作りました。回路を作りながら思ったのは、「自分でGND(-)と5v(+)のラインを決めてつくると良い」ということです。
ブレッドボードは元から決まっているように、そうすることで混乱が防げると思いました。

線材も、単線だけだとつなぎにくいものもあるのでより線もあるといいな、と気づきました。今日はここまで!