てるてるマイコンコードを色々いじってみる。
てるてるコードその1
てるてるコードその2
voltmeterが動かなくなったのですが
文字列の後にこの数値ひろえー命令をあれは出していて
サイトが時々更新されて
その文字列が無くなってしまう時があるようです。
文字列が復活したのでひとまず動きそうだ!
と思ってもう一度動作確認中なのですが
…またウェブから値がやってこない病が…
2008年6月29日日曜日

2008年6月28日土曜日
yahooweather teruteru
utano
てるてるリベンジ中。
yahoo news(英語)のお天気サイトから
お天気情報をひっぱって、
更に曇りなら1、晴れなら2、雨なら3にするというPHPを書きました。
これのソースコードを見ると、
本のp.131みたく <weather:1>とか出ます。
で、マイコン側のプログラムはほとんどそのままに、
このPHPを読んで<>内の数字を記憶して
その数字をintにして、
if文で1のときは曇りなので曇りLED光らせてねっていう
void teruteru()をつくりました。コンパイルは成功。
yahooweatherてるてるマイコンコード
でも光りませんでした。
たまにvoltmeterでもそうなのですが
ウェブを要求した後その内容を読み込んでくれない時が発生します。
うーむぅ。
しょうさまたすけて。
てるてるリベンジ中。
yahoo news(英語)のお天気サイトから
お天気情報をひっぱって、
更に曇りなら1、晴れなら2、雨なら3にするというPHPを書きました。
これのソースコードを見ると、
本のp.131みたく <weather:1>とか出ます。
で、マイコン側のプログラムはほとんどそのままに、
このPHPを読んで<>内の数字を記憶して
その数字をintにして、
if文で1のときは曇りなので曇りLED光らせてねっていう
void teruteru()をつくりました。コンパイルは成功。
yahooweatherてるてるマイコンコード
でも光りませんでした。
たまにvoltmeterでもそうなのですが
ウェブを要求した後その内容を読み込んでくれない時が発生します。
うーむぅ。
しょうさまたすけて。
2008年6月27日金曜日
voltmeter完成
voltmeterが動きました!
このプロジェクトはアメリカの大気の汚染予報を教えてくれる、
AIRNowというサイトからNYの大気汚染度の現在情報を拾って
電流計メーター(アナログ)に出力させるというものです。
よく写真を見ると針が右にすこし振れています。

結局あの後いじったのは:
☆ルーターのIPを設定
(chapter3のp.84参照、ルータのIPアドレス調べ方)
☆ウェブから情報をはぎとるPHPのパーミッション変更
(Octalを707に、きょんちゃんアドバイス)
どれが果たして功を奏したのかw
全体像はこんな感じ:

あ、FT232Rのシリアル変換はさしっぱだっただけで無関係です。
LEDがナウシカのオームの目みたい…

2番目が光ってるのでHTTPrequest()してます。
情報を読み取るウェブ(PHP)を要求しているのです。
Arduinoの画面ではこんな感じ:

このプロジェクトはアメリカの大気の汚染予報を教えてくれる、
AIRNowというサイトからNYの大気汚染度の現在情報を拾って
電流計メーター(アナログ)に出力させるというものです。
よく写真を見ると針が右にすこし振れています。
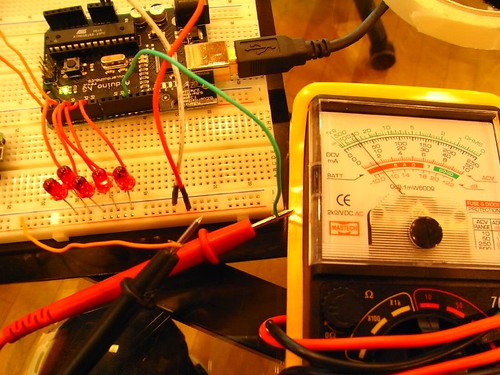
結局あの後いじったのは:
☆ルーターのIPを設定
(chapter3のp.84参照、ルータのIPアドレス調べ方)
☆ウェブから情報をはぎとるPHPのパーミッション変更
(Octalを707に、きょんちゃんアドバイス)
どれが果たして功を奏したのかw
全体像はこんな感じ:
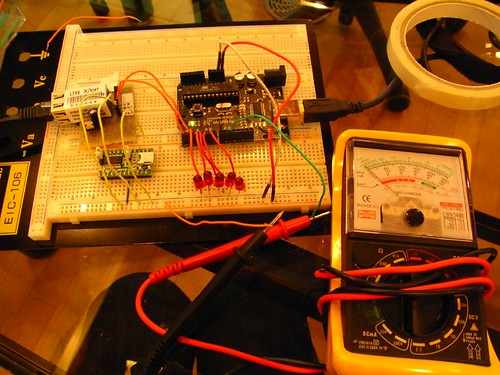
あ、FT232Rのシリアル変換はさしっぱだっただけで無関係です。
LEDがナウシカのオームの目みたい…
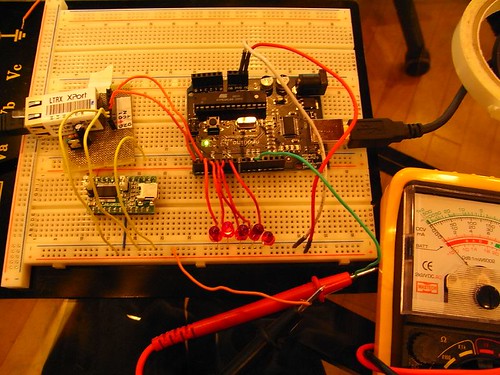
2番目が光ってるのでHTTPrequest()してます。
情報を読み取るウェブ(PHP)を要求しているのです。
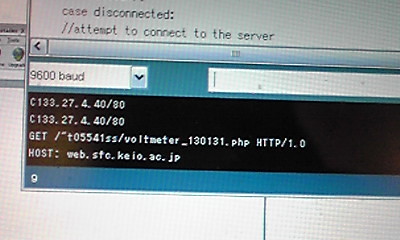
Arduinoの画面ではこんな感じ:
マイコンとXPortとウェブの三角関係②
本に沿って回路つくってコードを書くと、
ご丁寧に今どういう通信状態なのかをLEDで判断する事が出来ます。
でも大体サーバに接続しようとしてる所で
ピコピコ止まりだったので、
もう少し通信状態を可視化しようと思いました。
まずAcknowrichとshokai様から頂いたSocketClientで実験
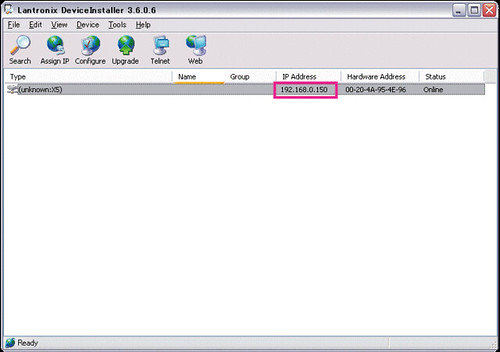
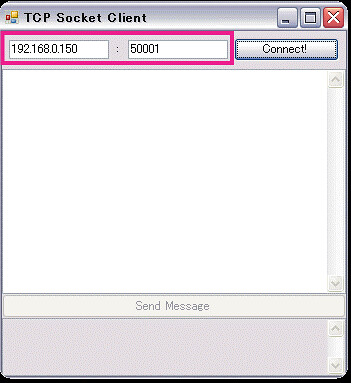
XPort接続中。IPアドレスは192.168.0.150 ポート番号は50001に設定済。

ではSocketClientからXPortさんにアクセスしてみましょう

するとシリアル側(Acknowrich)ではI192.168.0.110と出る。

IはIncomeのIなので、情報が伝わった事はわかるけど
なんでIPアドレスが変わるんじゃ?
本でXPort設定のところでルーターのIPを指定する所あるけど
そこと関係があるんでしょうか??
まぁ一旦おいといて
シリアル側から、欲しいウェブがあるサーバに行ってねってお願いしてみる

…ただのテキスト扱いっぽいんですけど
GETとかHOSTも入れてみたけど同じ。
SocketClientを終了すると

ちゃんとDisconnectのDが現れる。
つながっているようでつながっていないような…
何が問題なんじゃー。
ご丁寧に今どういう通信状態なのかをLEDで判断する事が出来ます。
でも大体サーバに接続しようとしてる所で
ピコピコ止まりだったので、
もう少し通信状態を可視化しようと思いました。
まずAcknowrichとshokai様から頂いたSocketClientで実験
XPort接続中。IPアドレスは192.168.0.150 ポート番号は50001に設定済。
ではSocketClientからXPortさんにアクセスしてみましょう
するとシリアル側(Acknowrich)ではI192.168.0.110と出る。

IはIncomeのIなので、情報が伝わった事はわかるけど
なんでIPアドレスが変わるんじゃ?
本でXPort設定のところでルーターのIPを指定する所あるけど
そこと関係があるんでしょうか??
まぁ一旦おいといて
シリアル側から、欲しいウェブがあるサーバに行ってねってお願いしてみる

…ただのテキスト扱いっぽいんですけど
GETとかHOSTも入れてみたけど同じ。
SocketClientを終了すると
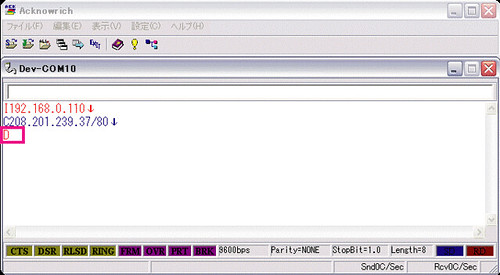
ちゃんとDisconnectのDが現れる。
つながっているようでつながっていないような…
何が問題なんじゃー。
マイコンとXPortとウェブの三角関係①
utano
夜12時にDNPを訪れる!
てるてる坊主を作るにしても
とりあえず本にあるArduinoに書き込む、
ウェブを取り込むコードを理解しなければだめでしょう
ということで回路や本やら5時間くらいにらめっこして
ようやく本が書いてるコードが意図する所がつかめました。
マイコンで取ってきて欲しいウェブがあるサーバを呼ぶ
私の場合SFCなのでコマンドプロンプトでping web.sfc.keio.ac.jpを唱えて
SFCサーバのIPアドレスをゲットする。
そしてXPortに通じる呪文にする C133.27.4.40
接続が行われたらすかさずウェブを呼び出す
GET /~t05541ss/ほにゃほにゃ.php HTTP/1.0\n
HOST: web.sfc.keio.ac.jp
で、そのウェブのテキストをがーって読んで
その中から数字をゲットしてくる
その数字を更に数値にする(テキストのままだから)
あらかじめマイコンが読みやすい様に
そのウェブはPHPですっきりまとめてあります
HTMLタグ全部どけて、この文章の後に来る数字を表示してねって感じで。
で、その数値によってArduinoのoutputである電流計の触れ幅が変わる
っちゅうわけです。構造は分かるけど
XPort経由でウェブを問い合わせるのがなんかだめ。
ちゃんと動いているのか動作チェックする。
マイコンとXPortとウェブの三角関係②につづく。
夜12時にDNPを訪れる!
てるてる坊主を作るにしても
とりあえず本にあるArduinoに書き込む、
ウェブを取り込むコードを理解しなければだめでしょう
ということで回路や本やら5時間くらいにらめっこして
ようやく本が書いてるコードが意図する所がつかめました。
マイコンで取ってきて欲しいウェブがあるサーバを呼ぶ
私の場合SFCなのでコマンドプロンプトでping web.sfc.keio.ac.jpを唱えて
SFCサーバのIPアドレスをゲットする。
そしてXPortに通じる呪文にする C133.27.4.40
接続が行われたらすかさずウェブを呼び出す
GET /~t05541ss/ほにゃほにゃ.php HTTP/1.0\n
HOST: web.sfc.keio.ac.jp
で、そのウェブのテキストをがーって読んで
その中から数字をゲットしてくる
その数字を更に数値にする(テキストのままだから)
あらかじめマイコンが読みやすい様に
そのウェブはPHPですっきりまとめてあります
HTMLタグ全部どけて、この文章の後に来る数字を表示してねって感じで。
で、その数値によってArduinoのoutputである電流計の触れ幅が変わる
っちゅうわけです。構造は分かるけど
XPort経由でウェブを問い合わせるのがなんかだめ。
ちゃんと動いているのか動作チェックする。
マイコンとXPortとウェブの三角関係②につづく。
2008年6月23日月曜日
voltmeter
utano
chapter4のvoltmeterのソースコードです。
一応コンパイルが通りました。
でも、void blink()のところがなんかきれいにブログで出なかったので
そこは本をみて調整してください。
つかHTMLタグとかがブログにアップするときにひっかかるので…
//Defines for the program's status (used for status variable):
#define disconnected 0
#define connecting 1
#define connected 2
#define requesting 3
#define reading 4
#define requestComplete 5
//Defines for I/O pins:
#define connectedLED 2 //indicates when there's a TCP connection
#define requestingLED 3 //indicates a HTTP request has been made
#define readingLED 4 //indicates a device is reading HTTP results
#define requestCompleteLED 5 //indicates a successful read
#define programResetLED 6 //indicates reset of Arduino
#define deviceResetPin 7 //resets Lantronix Device
#define meterPin 11 //controls VU meter; has to be one of thePWM pins 9-11
//Defines for voltmeter
#define meterMax 130 //max value on the meter
#define meterScale 150 //my meter reads 0-150
//variables
int inByte = -1; //incoming byte from serial RX
char inString[32]; //string for incoming serial data
int stringPos = 0; //string index counter
int status = 0; //Lantronix device's connection status
long lastCompletionTime = 0;//counter for delay after last completion
void setup(){
//set all status LED pins and Lantronix device reset pin:
pinMode(connectedLED, OUTPUT);
pinMode(requestingLED, OUTPUT);
pinMode(requestCompleteLED, OUTPUT);
pinMode(programResetLED, OUTPUT);
pinMode(deviceResetPin, OUTPUT);
pinMode(meterPin, OUTPUT);
//start serial port, 9600 8-N-1
Serial.begin(9600);
//reset Lantronix device
resetDevice();
//blink reset LED
blink(3);
}
//Take the Lantronix device's reset pin low to reset it
void resetDevice(){
digitalWrite(deviceResetPin, LOW);
delay(50);
digitalWrite(deviceResetPin, HIGH);
//pause to let Lantronix device boot up
delay(2000);
}
//Blink the reset LED
void blink(int howManyTimes){
int i;
for(i=0; i
delay(200);
digitalWrite(programResetLED, LOW);
delay(200);
}
}
void loop(){
stateCheck();
setLEDs();
}
void stateCheck(){
switch(status){
case disconnected:
//attempt to connect to the server
deviceConnect();
break;
case connecting:
//until you get a C, keep trying to connect: read the serial port
if(Serial.available()){
inByte = Serial.read();
if(inByte == 'C'){ //'C' in ASCII
status = connected;
}
else{
//if you got anything other than a C, try again
deviceConnect();
}
}
break;
case connected:
//send HTTP GET request for CGI script
httpRequest();
break;
case requesting:
lookForData();
break;
case reading:
readData();
break;
case requestComplete:
waitForNextRequest();
}
}
void deviceConnect(){
//send out the server address and wait for a "C"byte to come back.
//fill in your serves numerical address below
Serial.print("C192.168.0.150/80\n");
status = connecting;
}
void httpRequest(){
//make sure you've cleared the last byte from the last request
inByte = -1;
//reset the string position counter
stringPos = 0;
//make HTTP GET request and fill in the path to your version of the CGI script
Serial.print("GET /~t05541ss/public_html/voltmeter_130131.php HTTP/1.0\n");
//fill in your server's name
Serial.print("HOST:web.sfc.keio.ac.jp\n\n");
//update the state of the program
status = requesting;
}
void lookForData(){
//wait for bytes from server
if(Serial.available()){
inByte = Serial.read();
//if you get a "<", what follows is the air quality index. you need to read what follows "<"
if(inByte == '<'){
stringPos = 0;
status = reading;
}
}
}
void readData(){
if(Serial.available()){
inByte = Serial.read();
//keep reading until you get a ">"
if(inByte !='>'){
//save only ASCII numeric characters (ASCII 0-9)
if((inByte >= '0') && (inByte <= '9')){
inString[stringPos] = inByte;
stringPos++;
}
}
//if you get a ">" you've reached the end of the AQI reading
else{
interpretResults();
}
}
}
void interpretResults(){
//convert the string to a numeric value
int airQuality = atoi(inString);
//set the meter appropriately
setMeter(airQuality);
lastCompletionTime = millis();
status = requestComplete;
}
void setMeter(int desiredValue){
int airQualityValue = 0;
//if the value won't peg the meter, convert it to the meter scale and send it out
if(desiredValue <= meterScale){
airQualityValue = (desiredValue * meterMax/meterScale);
analogWrite(meterPin, airQualityValue);
}
}
void waitForNextRequest(){
if(millis() - lastCompletionTime >= 120000){
//reset Lantronix device before next request
resetDevice();
status = disconnected;
}
}
void setLEDs(){
/* Except for the disconnected and connecting states,
all the states of the program have corresponding LEDs.
so you can use a for-net loop to set them by turning them all off except for the one that has
the same number as the current program state
*/
for(int thisLED = 2; thisLED <= 5; thisLED++){
if(thisLED == status){
digitalWrite(thisLED, HIGH);
}
else{
digitalWrite(thisLED, LOW);
}
}
}
chapter4のvoltmeterのソースコードです。
一応コンパイルが通りました。
でも、void blink()のところがなんかきれいにブログで出なかったので
そこは本をみて調整してください。
つかHTMLタグとかがブログにアップするときにひっかかるので…
//Defines for the program's status (used for status variable):
#define disconnected 0
#define connecting 1
#define connected 2
#define requesting 3
#define reading 4
#define requestComplete 5
//Defines for I/O pins:
#define connectedLED 2 //indicates when there's a TCP connection
#define requestingLED 3 //indicates a HTTP request has been made
#define readingLED 4 //indicates a device is reading HTTP results
#define requestCompleteLED 5 //indicates a successful read
#define programResetLED 6 //indicates reset of Arduino
#define deviceResetPin 7 //resets Lantronix Device
#define meterPin 11 //controls VU meter; has to be one of thePWM pins 9-11
//Defines for voltmeter
#define meterMax 130 //max value on the meter
#define meterScale 150 //my meter reads 0-150
//variables
int inByte = -1; //incoming byte from serial RX
char inString[32]; //string for incoming serial data
int stringPos = 0; //string index counter
int status = 0; //Lantronix device's connection status
long lastCompletionTime = 0;//counter for delay after last completion
void setup(){
//set all status LED pins and Lantronix device reset pin:
pinMode(connectedLED, OUTPUT);
pinMode(requestingLED, OUTPUT);
pinMode(requestCompleteLED, OUTPUT);
pinMode(programResetLED, OUTPUT);
pinMode(deviceResetPin, OUTPUT);
pinMode(meterPin, OUTPUT);
//start serial port, 9600 8-N-1
Serial.begin(9600);
//reset Lantronix device
resetDevice();
//blink reset LED
blink(3);
}
//Take the Lantronix device's reset pin low to reset it
void resetDevice(){
digitalWrite(deviceResetPin, LOW);
delay(50);
digitalWrite(deviceResetPin, HIGH);
//pause to let Lantronix device boot up
delay(2000);
}
//Blink the reset LED
void blink(int howManyTimes){
int i;
for(i=0; i
delay(200);
digitalWrite(programResetLED, LOW);
delay(200);
}
}
void loop(){
stateCheck();
setLEDs();
}
void stateCheck(){
switch(status){
case disconnected:
//attempt to connect to the server
deviceConnect();
break;
case connecting:
//until you get a C, keep trying to connect: read the serial port
if(Serial.available()){
inByte = Serial.read();
if(inByte == 'C'){ //'C' in ASCII
status = connected;
}
else{
//if you got anything other than a C, try again
deviceConnect();
}
}
break;
case connected:
//send HTTP GET request for CGI script
httpRequest();
break;
case requesting:
lookForData();
break;
case reading:
readData();
break;
case requestComplete:
waitForNextRequest();
}
}
void deviceConnect(){
//send out the server address and wait for a "C"byte to come back.
//fill in your serves numerical address below
Serial.print("C192.168.0.150/80\n");
status = connecting;
}
void httpRequest(){
//make sure you've cleared the last byte from the last request
inByte = -1;
//reset the string position counter
stringPos = 0;
//make HTTP GET request and fill in the path to your version of the CGI script
Serial.print("GET /~t05541ss/public_html/voltmeter_130131.php HTTP/1.0\n");
//fill in your server's name
Serial.print("HOST:web.sfc.keio.ac.jp\n\n");
//update the state of the program
status = requesting;
}
void lookForData(){
//wait for bytes from server
if(Serial.available()){
inByte = Serial.read();
//if you get a "<", what follows is the air quality index. you need to read what follows "<"
if(inByte == '<'){
stringPos = 0;
status = reading;
}
}
}
void readData(){
if(Serial.available()){
inByte = Serial.read();
//keep reading until you get a ">"
if(inByte !='>'){
//save only ASCII numeric characters (ASCII 0-9)
if((inByte >= '0') && (inByte <= '9')){
inString[stringPos] = inByte;
stringPos++;
}
}
//if you get a ">" you've reached the end of the AQI reading
else{
interpretResults();
}
}
}
void interpretResults(){
//convert the string to a numeric value
int airQuality = atoi(inString);
//set the meter appropriately
setMeter(airQuality);
lastCompletionTime = millis();
status = requestComplete;
}
void setMeter(int desiredValue){
int airQualityValue = 0;
//if the value won't peg the meter, convert it to the meter scale and send it out
if(desiredValue <= meterScale){
airQualityValue = (desiredValue * meterMax/meterScale);
analogWrite(meterPin, airQualityValue);
}
}
void waitForNextRequest(){
if(millis() - lastCompletionTime >= 120000){
//reset Lantronix device before next request
resetDevice();
status = disconnected;
}
}
void setLEDs(){
/* Except for the disconnected and connecting states,
all the states of the program have corresponding LEDs.
so you can use a for-net loop to set them by turning them all off except for the one that has
the same number as the current program state
*/
for(int thisLED = 2; thisLED <= 5; thisLED++){
if(thisLED == status){
digitalWrite(thisLED, HIGH);
}
else{
digitalWrite(thisLED, LOW);
}
}
}
2008年6月19日木曜日
p.130 PHP
utano
p.130のPHPコードです。
ウェブのテキストだけ抽出する(HTMLタグどける)ものです。
こんなかんじ。
/* AIRNow Web Page Scraper
Language: PHP
*/
$readParticles = 0; //flag telling you the next time is the particle value
$particles = -1;
//Define variables
//url of the page with the air quality index data for New York City
$url = 'http://airnow.gov/index.cfm?action=airnow.showlocal&CityID=164';
//open the file at the url for reading;
$filePath = fopen($url, "r");
//as long as you haven't reached the end of the file:
while(!feof($filePath)){
//read one line at a time, and strip all HTML and PHP tags from the line
$line = fgetss($filePath, 4096);
echo $line;
}
//close the file at the URL , you're done
fclose($filePath);
?>
p.131と合体させたもの。
これはテキスト化したウェブから、
ある文字列が出たあとの後ろのテキストを抽出するコード。
こんなかんじ。
/* AIRNow Web Page Scraper
Language: PHP
*/
$readParticles = 0; //flag telling you the next time is the particle value
$particles = -1;
//Define variables
//url of the page with the air quality index data for New York City
$url = 'http://airnow.gov/index.cfm?action=airnow.showlocal&CityID=164';
//open the file at the url for reading;
$filePath = fopen($url, "r");
//as long as you haven't reached the end of the file:
while(!feof($filePath)){
//read one line at a time, and strip all HTML and PHP tags from the line
$line = fgetss($filePath, 4096);
if($readParticles == 1){
$particles = trim($line);
echo "";
$readParticles = 0;
}
if(preg_match('/AQI observed at /', $line)){
if($particles == -1){
$readParticles = 1;
}
}
}
//close the file at the URL , you're done
fclose($filePath);
?>
p.130のPHPコードです。
ウェブのテキストだけ抽出する(HTMLタグどける)ものです。
こんなかんじ。
/* AIRNow Web Page Scraper
Language: PHP
*/
$readParticles = 0; //flag telling you the next time is the particle value
$particles = -1;
//Define variables
//url of the page with the air quality index data for New York City
$url = 'http://airnow.gov/index.cfm?action=airnow.showlocal&CityID=164';
//open the file at the url for reading;
$filePath = fopen($url, "r");
//as long as you haven't reached the end of the file:
while(!feof($filePath)){
//read one line at a time, and strip all HTML and PHP tags from the line
$line = fgetss($filePath, 4096);
echo $line;
}
//close the file at the URL , you're done
fclose($filePath);
?>
p.131と合体させたもの。
これはテキスト化したウェブから、
ある文字列が出たあとの後ろのテキストを抽出するコード。
こんなかんじ。
/* AIRNow Web Page Scraper
Language: PHP
*/
$readParticles = 0; //flag telling you the next time is the particle value
$particles = -1;
//Define variables
//url of the page with the air quality index data for New York City
$url = 'http://airnow.gov/index.cfm?action=airnow.showlocal&CityID=164';
//open the file at the url for reading;
$filePath = fopen($url, "r");
//as long as you haven't reached the end of the file:
while(!feof($filePath)){
//read one line at a time, and strip all HTML and PHP tags from the line
$line = fgetss($filePath, 4096);
if($readParticles == 1){
$particles = trim($line);
echo "
$readParticles = 0;
}
if(preg_match('/AQI observed at /', $line)){
if($particles == -1){
$readParticles = 1;
}
}
}
//close the file at the URL , you're done
fclose($filePath);
?>
2008年6月18日水曜日
XPort
utano
XPortで回路を組みました。p.125まで終わりました。

Arduinoは電源をXPortに供給しています。
なので電池とかアダプタが無くてもつくれます。
本に書いてある回路ではブレッドボードに
三端子とかコンデンサとかがぶっささってますが
上の写真では既にXPortにドッキングさせたものを使っています。
Arduinoの5VとGNDをXPortのVCCとGNDにそれぞれつなぎ
XPortのOUTをFT232R USBシリアル変換のRXD、INをTXDにつなぐ。
シリアル変換のGNDとArduinoのGNDは共有してください。
またシリアル変換の電源はUSBケーブルでPCから供給するので
5Vにつなぐ必要性はありません。
つないだら、XPortの設定を行います。
LANケーブルを用意してください。
Making Things TalkではMicroというマイコンを使っているので
設定の仕方が異なります。
p.121-123の部分は以下の資料で設定を行いましょう。
XPort設定資料:
ismlog XPort①
ismlog XPort②
XPortで回路を組みました。p.125まで終わりました。
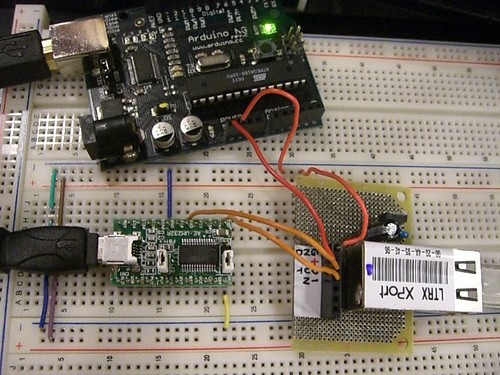
Arduinoは電源をXPortに供給しています。
なので電池とかアダプタが無くてもつくれます。
本に書いてある回路ではブレッドボードに
三端子とかコンデンサとかがぶっささってますが
上の写真では既にXPortにドッキングさせたものを使っています。
Arduinoの5VとGNDをXPortのVCCとGNDにそれぞれつなぎ
XPortのOUTをFT232R USBシリアル変換のRXD、INをTXDにつなぐ。
シリアル変換のGNDとArduinoのGNDは共有してください。
またシリアル変換の電源はUSBケーブルでPCから供給するので
5Vにつなぐ必要性はありません。
つないだら、XPortの設定を行います。
LANケーブルを用意してください。
Making Things TalkではMicroというマイコンを使っているので
設定の仕方が異なります。
p.121-123の部分は以下の資料で設定を行いましょう。
XPort設定資料:
ismlog XPort①
ismlog XPort②
登録:
投稿 (Atom)