tmgです。
たまにはためになることを
今xportで、通信してピンポンをするシーソー作ってます。文字だけ見るとなんのこっちゃって感じですね。
p160までのコードです。エラーはないはず!
resetdeviceのくだりはまるっと無視しました。だってXportからそんなピンでてないんだもん…
----------------------
/*
pong cliant
Langage: Writing/Arduino
このプログラムはArduinoで、ネットワークにつながった
ピンポンのパドルをコントロールすることを可能にする
*/
//Lantronix deviceのステータスを定義する
#define disconnected 0
#define connected 1
#define connecting 2
//I/Oピンを定義する
#define connectButtonPin 2
#define rightLED 3
#define leftLED 4
#define connectionLED 5
#define connectButtonLED 6
int inByte= -1;
int status = disconnected;
byte connectButton = 0;
byte lastConnectButton = 0;
byte paddleMessage = 0;
byte connectMessage = 0;
void setup(){
pinMode(connectButtonPin,INPUT);
pinMode(rightLED,OUTPUT);
pinMode(leftLED,OUTPUT);
pinMode(connectionLED,OUTPUT);
pinMode(connectButtonLED,OUTPUT);
Serial.begin(9600);
}
void loop(){
readSensors();
setLeds();
stateCheck();
}
void readSensors(){
int leftThereshold = 500;//適宜
int rightThreshold = 420;//変えてね
int x = analogRead(0);
delay(10);
if (x > leftThereshold){
paddleMessage = 'l';
} else if (x > rightThreshold){
paddleMessage = 'r';
} else {
paddleMessage = 0;
}
connectButton = digitalRead(connectButtonPin);
connectMessage = 0;
if (connectButton == HIGH){
if (connectButton != lastConnectButton){
digitalWrite(connectButtonLED,HIGH);
connectMessage = 'x';
}
}
lastConnectButton = connectButton;
}
void setLeds(){
switch (paddleMessage){
case 'l':
digitalWrite(leftLED,HIGH);
digitalWrite(rightLED,LOW);
break;
case 'r':
digitalWrite(rightLED,HIGH);
digitalWrite(leftLED,LOW);
break;
case 0:
digitalWrite(leftLED,LOW);
digitalWrite(rightLED,LOW);
}
if (connectMessage !=0){
digitalWrite(connectButtonLED,HIGH);
}
else{
digitalWrite(connectButtonLED,LOW);
}
if (status == connected){
digitalWrite(connectionLED,HIGH);
}
else {
digitalWrite(connectionLED,LOW);
}
}
void stateCheck() {
switch (status){
case connected:
while (Serial.available() > 0){
if(Serial.read() == 'D'){
status = disconnected;
}
}
if (paddleMessage != 0) {
Serial.print(paddleMessage);
paddleMessage = 0;
}
if (connectMessage != 0){
Serial.print(connectMessage);
connectMessage = 0;
}
break;
case disconnected:
if (connectMessage !=0){
deviceConnect();
connectMessage = 0;
}
break;
case connecting:
if (Serial.available()){
inByte = Serial.read();
if (inByte == 'C'){
status = connected;
}
else{
deviceConnect();
}
}
break;
}
}
void deviceConnect() {
Serial.print("C192.168.0.182/50001\n\r");//←ここ自分のに変えてくださいね
status = connecting;
}
void blink(int howManyTimes){
for (int i=0; i< howManyTimes; i++) {
digitalWrite(connectButtonLED,HIGH);
delay(200);
digitalWrite(connectButtonLED,LOW);
delay(200);
}
}
2008年6月27日金曜日

ドライバ
とまごうです。
泰子さんが
ずっとできないできないと悩んでいたのだけど、
私たちが買ったFT232RLは、
WinXPではドライバーをインストールしないと使えないってしってた??
http://www.ftdichip.com/Drivers/VCP.htm
FT232RLのWinXP用のものをダウンロードして、ハードウェアの検
出ウィザードがでたらインストールしてあげましょう。
って取り扱い説明書に書いてあった。
って言ってたので↑、ダウンロードしたら出来ました!
しかし…上のドライバーをインストールしたら、今度はarduinoのほうを認識しなくなって仕舞いました。おろろーん
同社製品を何個もインストールしたからてんぱるのかしら?
わたしだけ?
とりあえずchap5はFT(ry使わなくてもいいっぽいんでアンインストール&インストールします。
泰子さんが
ずっとできないできないと悩んでいたのだけど、
私たちが買ったFT232RLは、
WinXPではドライバーをインストールしないと使えないってしってた??
http://www.ftdichip.com/Drivers/VCP.htm
FT232RLのWinXP用のものをダウンロードして、ハードウェアの検
出ウィザードがでたらインストールしてあげましょう。
って取り扱い説明書に書いてあった。
って言ってたので↑、ダウンロードしたら出来ました!
しかし…上のドライバーをインストールしたら、今度はarduinoのほうを認識しなくなって仕舞いました。おろろーん
同社製品を何個もインストールしたからてんぱるのかしら?
わたしだけ?
とりあえずchap5はFT(ry使わなくてもいいっぽいんでアンインストール&インストールします。
2008年6月25日水曜日
てるてる坊主(途中)
o9no大先生の力によって
livedoorお天気のRSSから天気を表示するPHPが出来ました。
そこから更にマイコンが晴れとか雨とか読めるように
雨なら1、などの数字を割り当てるPHPを書きました。
問題はマイコンなのです。
XPortを通じて、
「ライブドアお天気の天気を数字に」ファイルを呼び出して
ウェブの情報をだーって読んでっていう本に載ってるプログラムを
てるてる仕様に変えなきゃいけないんですが…
そもそもの電流計のやつも動いてくれないので
(でもなんかわかりそうな気もする)
雲行きがあやしくなってきました。
livedoorお天気のRSSから天気を表示するPHPが出来ました。
そこから更にマイコンが晴れとか雨とか読めるように
雨なら1、などの数字を割り当てるPHPを書きました。
問題はマイコンなのです。
XPortを通じて、
「ライブドアお天気の天気を数字に」ファイルを呼び出して
ウェブの情報をだーって読んでっていう本に載ってるプログラムを
てるてる仕様に変えなきゃいけないんですが…
そもそもの電流計のやつも動いてくれないので
(でもなんかわかりそうな気もする)
雲行きがあやしくなってきました。
2008年6月23日月曜日
voltmeter
utano
chapter4のvoltmeterのソースコードです。
一応コンパイルが通りました。
でも、void blink()のところがなんかきれいにブログで出なかったので
そこは本をみて調整してください。
つかHTMLタグとかがブログにアップするときにひっかかるので…
//Defines for the program's status (used for status variable):
#define disconnected 0
#define connecting 1
#define connected 2
#define requesting 3
#define reading 4
#define requestComplete 5
//Defines for I/O pins:
#define connectedLED 2 //indicates when there's a TCP connection
#define requestingLED 3 //indicates a HTTP request has been made
#define readingLED 4 //indicates a device is reading HTTP results
#define requestCompleteLED 5 //indicates a successful read
#define programResetLED 6 //indicates reset of Arduino
#define deviceResetPin 7 //resets Lantronix Device
#define meterPin 11 //controls VU meter; has to be one of thePWM pins 9-11
//Defines for voltmeter
#define meterMax 130 //max value on the meter
#define meterScale 150 //my meter reads 0-150
//variables
int inByte = -1; //incoming byte from serial RX
char inString[32]; //string for incoming serial data
int stringPos = 0; //string index counter
int status = 0; //Lantronix device's connection status
long lastCompletionTime = 0;//counter for delay after last completion
void setup(){
//set all status LED pins and Lantronix device reset pin:
pinMode(connectedLED, OUTPUT);
pinMode(requestingLED, OUTPUT);
pinMode(requestCompleteLED, OUTPUT);
pinMode(programResetLED, OUTPUT);
pinMode(deviceResetPin, OUTPUT);
pinMode(meterPin, OUTPUT);
//start serial port, 9600 8-N-1
Serial.begin(9600);
//reset Lantronix device
resetDevice();
//blink reset LED
blink(3);
}
//Take the Lantronix device's reset pin low to reset it
void resetDevice(){
digitalWrite(deviceResetPin, LOW);
delay(50);
digitalWrite(deviceResetPin, HIGH);
//pause to let Lantronix device boot up
delay(2000);
}
//Blink the reset LED
void blink(int howManyTimes){
int i;
for(i=0; i
delay(200);
digitalWrite(programResetLED, LOW);
delay(200);
}
}
void loop(){
stateCheck();
setLEDs();
}
void stateCheck(){
switch(status){
case disconnected:
//attempt to connect to the server
deviceConnect();
break;
case connecting:
//until you get a C, keep trying to connect: read the serial port
if(Serial.available()){
inByte = Serial.read();
if(inByte == 'C'){ //'C' in ASCII
status = connected;
}
else{
//if you got anything other than a C, try again
deviceConnect();
}
}
break;
case connected:
//send HTTP GET request for CGI script
httpRequest();
break;
case requesting:
lookForData();
break;
case reading:
readData();
break;
case requestComplete:
waitForNextRequest();
}
}
void deviceConnect(){
//send out the server address and wait for a "C"byte to come back.
//fill in your serves numerical address below
Serial.print("C192.168.0.150/80\n");
status = connecting;
}
void httpRequest(){
//make sure you've cleared the last byte from the last request
inByte = -1;
//reset the string position counter
stringPos = 0;
//make HTTP GET request and fill in the path to your version of the CGI script
Serial.print("GET /~t05541ss/public_html/voltmeter_130131.php HTTP/1.0\n");
//fill in your server's name
Serial.print("HOST:web.sfc.keio.ac.jp\n\n");
//update the state of the program
status = requesting;
}
void lookForData(){
//wait for bytes from server
if(Serial.available()){
inByte = Serial.read();
//if you get a "<", what follows is the air quality index. you need to read what follows "<"
if(inByte == '<'){
stringPos = 0;
status = reading;
}
}
}
void readData(){
if(Serial.available()){
inByte = Serial.read();
//keep reading until you get a ">"
if(inByte !='>'){
//save only ASCII numeric characters (ASCII 0-9)
if((inByte >= '0') && (inByte <= '9')){
inString[stringPos] = inByte;
stringPos++;
}
}
//if you get a ">" you've reached the end of the AQI reading
else{
interpretResults();
}
}
}
void interpretResults(){
//convert the string to a numeric value
int airQuality = atoi(inString);
//set the meter appropriately
setMeter(airQuality);
lastCompletionTime = millis();
status = requestComplete;
}
void setMeter(int desiredValue){
int airQualityValue = 0;
//if the value won't peg the meter, convert it to the meter scale and send it out
if(desiredValue <= meterScale){
airQualityValue = (desiredValue * meterMax/meterScale);
analogWrite(meterPin, airQualityValue);
}
}
void waitForNextRequest(){
if(millis() - lastCompletionTime >= 120000){
//reset Lantronix device before next request
resetDevice();
status = disconnected;
}
}
void setLEDs(){
/* Except for the disconnected and connecting states,
all the states of the program have corresponding LEDs.
so you can use a for-net loop to set them by turning them all off except for the one that has
the same number as the current program state
*/
for(int thisLED = 2; thisLED <= 5; thisLED++){
if(thisLED == status){
digitalWrite(thisLED, HIGH);
}
else{
digitalWrite(thisLED, LOW);
}
}
}
chapter4のvoltmeterのソースコードです。
一応コンパイルが通りました。
でも、void blink()のところがなんかきれいにブログで出なかったので
そこは本をみて調整してください。
つかHTMLタグとかがブログにアップするときにひっかかるので…
//Defines for the program's status (used for status variable):
#define disconnected 0
#define connecting 1
#define connected 2
#define requesting 3
#define reading 4
#define requestComplete 5
//Defines for I/O pins:
#define connectedLED 2 //indicates when there's a TCP connection
#define requestingLED 3 //indicates a HTTP request has been made
#define readingLED 4 //indicates a device is reading HTTP results
#define requestCompleteLED 5 //indicates a successful read
#define programResetLED 6 //indicates reset of Arduino
#define deviceResetPin 7 //resets Lantronix Device
#define meterPin 11 //controls VU meter; has to be one of thePWM pins 9-11
//Defines for voltmeter
#define meterMax 130 //max value on the meter
#define meterScale 150 //my meter reads 0-150
//variables
int inByte = -1; //incoming byte from serial RX
char inString[32]; //string for incoming serial data
int stringPos = 0; //string index counter
int status = 0; //Lantronix device's connection status
long lastCompletionTime = 0;//counter for delay after last completion
void setup(){
//set all status LED pins and Lantronix device reset pin:
pinMode(connectedLED, OUTPUT);
pinMode(requestingLED, OUTPUT);
pinMode(requestCompleteLED, OUTPUT);
pinMode(programResetLED, OUTPUT);
pinMode(deviceResetPin, OUTPUT);
pinMode(meterPin, OUTPUT);
//start serial port, 9600 8-N-1
Serial.begin(9600);
//reset Lantronix device
resetDevice();
//blink reset LED
blink(3);
}
//Take the Lantronix device's reset pin low to reset it
void resetDevice(){
digitalWrite(deviceResetPin, LOW);
delay(50);
digitalWrite(deviceResetPin, HIGH);
//pause to let Lantronix device boot up
delay(2000);
}
//Blink the reset LED
void blink(int howManyTimes){
int i;
for(i=0; i
delay(200);
digitalWrite(programResetLED, LOW);
delay(200);
}
}
void loop(){
stateCheck();
setLEDs();
}
void stateCheck(){
switch(status){
case disconnected:
//attempt to connect to the server
deviceConnect();
break;
case connecting:
//until you get a C, keep trying to connect: read the serial port
if(Serial.available()){
inByte = Serial.read();
if(inByte == 'C'){ //'C' in ASCII
status = connected;
}
else{
//if you got anything other than a C, try again
deviceConnect();
}
}
break;
case connected:
//send HTTP GET request for CGI script
httpRequest();
break;
case requesting:
lookForData();
break;
case reading:
readData();
break;
case requestComplete:
waitForNextRequest();
}
}
void deviceConnect(){
//send out the server address and wait for a "C"byte to come back.
//fill in your serves numerical address below
Serial.print("C192.168.0.150/80\n");
status = connecting;
}
void httpRequest(){
//make sure you've cleared the last byte from the last request
inByte = -1;
//reset the string position counter
stringPos = 0;
//make HTTP GET request and fill in the path to your version of the CGI script
Serial.print("GET /~t05541ss/public_html/voltmeter_130131.php HTTP/1.0\n");
//fill in your server's name
Serial.print("HOST:web.sfc.keio.ac.jp\n\n");
//update the state of the program
status = requesting;
}
void lookForData(){
//wait for bytes from server
if(Serial.available()){
inByte = Serial.read();
//if you get a "<", what follows is the air quality index. you need to read what follows "<"
if(inByte == '<'){
stringPos = 0;
status = reading;
}
}
}
void readData(){
if(Serial.available()){
inByte = Serial.read();
//keep reading until you get a ">"
if(inByte !='>'){
//save only ASCII numeric characters (ASCII 0-9)
if((inByte >= '0') && (inByte <= '9')){
inString[stringPos] = inByte;
stringPos++;
}
}
//if you get a ">" you've reached the end of the AQI reading
else{
interpretResults();
}
}
}
void interpretResults(){
//convert the string to a numeric value
int airQuality = atoi(inString);
//set the meter appropriately
setMeter(airQuality);
lastCompletionTime = millis();
status = requestComplete;
}
void setMeter(int desiredValue){
int airQualityValue = 0;
//if the value won't peg the meter, convert it to the meter scale and send it out
if(desiredValue <= meterScale){
airQualityValue = (desiredValue * meterMax/meterScale);
analogWrite(meterPin, airQualityValue);
}
}
void waitForNextRequest(){
if(millis() - lastCompletionTime >= 120000){
//reset Lantronix device before next request
resetDevice();
status = disconnected;
}
}
void setLEDs(){
/* Except for the disconnected and connecting states,
all the states of the program have corresponding LEDs.
so you can use a for-net loop to set them by turning them all off except for the one that has
the same number as the current program state
*/
for(int thisLED = 2; thisLED <= 5; thisLED++){
if(thisLED == status){
digitalWrite(thisLED, HIGH);
}
else{
digitalWrite(thisLED, LOW);
}
}
}
2008年6月19日木曜日
p.130 PHP
utano
p.130のPHPコードです。
ウェブのテキストだけ抽出する(HTMLタグどける)ものです。
こんなかんじ。
/* AIRNow Web Page Scraper
Language: PHP
*/
$readParticles = 0; //flag telling you the next time is the particle value
$particles = -1;
//Define variables
//url of the page with the air quality index data for New York City
$url = 'http://airnow.gov/index.cfm?action=airnow.showlocal&CityID=164';
//open the file at the url for reading;
$filePath = fopen($url, "r");
//as long as you haven't reached the end of the file:
while(!feof($filePath)){
//read one line at a time, and strip all HTML and PHP tags from the line
$line = fgetss($filePath, 4096);
echo $line;
}
//close the file at the URL , you're done
fclose($filePath);
?>
p.131と合体させたもの。
これはテキスト化したウェブから、
ある文字列が出たあとの後ろのテキストを抽出するコード。
こんなかんじ。
/* AIRNow Web Page Scraper
Language: PHP
*/
$readParticles = 0; //flag telling you the next time is the particle value
$particles = -1;
//Define variables
//url of the page with the air quality index data for New York City
$url = 'http://airnow.gov/index.cfm?action=airnow.showlocal&CityID=164';
//open the file at the url for reading;
$filePath = fopen($url, "r");
//as long as you haven't reached the end of the file:
while(!feof($filePath)){
//read one line at a time, and strip all HTML and PHP tags from the line
$line = fgetss($filePath, 4096);
if($readParticles == 1){
$particles = trim($line);
echo "";
$readParticles = 0;
}
if(preg_match('/AQI observed at /', $line)){
if($particles == -1){
$readParticles = 1;
}
}
}
//close the file at the URL , you're done
fclose($filePath);
?>
p.130のPHPコードです。
ウェブのテキストだけ抽出する(HTMLタグどける)ものです。
こんなかんじ。
/* AIRNow Web Page Scraper
Language: PHP
*/
$readParticles = 0; //flag telling you the next time is the particle value
$particles = -1;
//Define variables
//url of the page with the air quality index data for New York City
$url = 'http://airnow.gov/index.cfm?action=airnow.showlocal&CityID=164';
//open the file at the url for reading;
$filePath = fopen($url, "r");
//as long as you haven't reached the end of the file:
while(!feof($filePath)){
//read one line at a time, and strip all HTML and PHP tags from the line
$line = fgetss($filePath, 4096);
echo $line;
}
//close the file at the URL , you're done
fclose($filePath);
?>
p.131と合体させたもの。
これはテキスト化したウェブから、
ある文字列が出たあとの後ろのテキストを抽出するコード。
こんなかんじ。
/* AIRNow Web Page Scraper
Language: PHP
*/
$readParticles = 0; //flag telling you the next time is the particle value
$particles = -1;
//Define variables
//url of the page with the air quality index data for New York City
$url = 'http://airnow.gov/index.cfm?action=airnow.showlocal&CityID=164';
//open the file at the url for reading;
$filePath = fopen($url, "r");
//as long as you haven't reached the end of the file:
while(!feof($filePath)){
//read one line at a time, and strip all HTML and PHP tags from the line
$line = fgetss($filePath, 4096);
if($readParticles == 1){
$particles = trim($line);
echo "
$readParticles = 0;
}
if(preg_match('/AQI observed at /', $line)){
if($particles == -1){
$readParticles = 1;
}
}
}
//close the file at the URL , you're done
fclose($filePath);
?>
2008年6月18日水曜日
XPort
utano
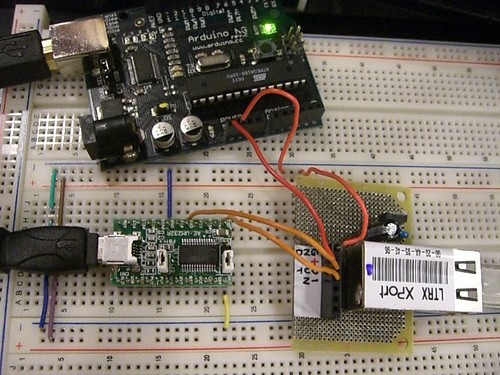
XPortで回路を組みました。p.125まで終わりました。

Arduinoは電源をXPortに供給しています。
なので電池とかアダプタが無くてもつくれます。
本に書いてある回路ではブレッドボードに
三端子とかコンデンサとかがぶっささってますが
上の写真では既にXPortにドッキングさせたものを使っています。
Arduinoの5VとGNDをXPortのVCCとGNDにそれぞれつなぎ
XPortのOUTをFT232R USBシリアル変換のRXD、INをTXDにつなぐ。
シリアル変換のGNDとArduinoのGNDは共有してください。
またシリアル変換の電源はUSBケーブルでPCから供給するので
5Vにつなぐ必要性はありません。
つないだら、XPortの設定を行います。
LANケーブルを用意してください。
Making Things TalkではMicroというマイコンを使っているので
設定の仕方が異なります。
p.121-123の部分は以下の資料で設定を行いましょう。
XPort設定資料:
ismlog XPort①
ismlog XPort②
XPortで回路を組みました。p.125まで終わりました。
Arduinoは電源をXPortに供給しています。
なので電池とかアダプタが無くてもつくれます。
本に書いてある回路ではブレッドボードに
三端子とかコンデンサとかがぶっささってますが
上の写真では既にXPortにドッキングさせたものを使っています。
Arduinoの5VとGNDをXPortのVCCとGNDにそれぞれつなぎ
XPortのOUTをFT232R USBシリアル変換のRXD、INをTXDにつなぐ。
シリアル変換のGNDとArduinoのGNDは共有してください。
またシリアル変換の電源はUSBケーブルでPCから供給するので
5Vにつなぐ必要性はありません。
つないだら、XPortの設定を行います。
LANケーブルを用意してください。
Making Things TalkではMicroというマイコンを使っているので
設定の仕方が異なります。
p.121-123の部分は以下の資料で設定を行いましょう。
XPort設定資料:
ismlog XPort①
ismlog XPort②
2008年6月14日土曜日
fwinkの設定
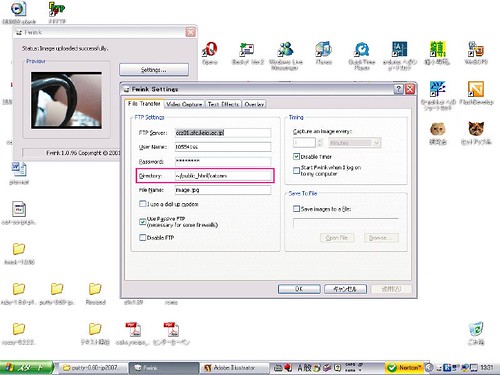
fwinkから画像がsfcサーバにアップできないという問題ですが解決しました。

fwinkの設定で、ftp serverは普通にccz00.sfc.keio.ac.jpとかでいいっぽい
次に画像を保存する先のフォルダ指定がだめでした
アカウントの直下のcatcamフォルダに保存したいので
~/public_html/catcam
とします。
本に書いてある/public_html/catcamだと
public_htmlがrootの直下にあるという意味になります。
実際sfcサーバはもうちょっとファイルの階層がありますので
指定した先がないよ~~ってなっちゃうのです。
ちなみにshokai様が教えてくれたトンネリングは実践したのですが
接続はできませんでした。なんでじゃー。
よくわかりませんが、通路をわざわざつくらなくても
FTPアクセスできるようになったんですかね??
fwinkの設定で、ftp serverは普通にccz00.sfc.keio.ac.jpとかでいいっぽい
次に画像を保存する先のフォルダ指定がだめでした
アカウントの直下のcatcamフォルダに保存したいので
~/public_html/catcam
とします。
本に書いてある/public_html/catcamだと
public_htmlがrootの直下にあるという意味になります。
実際sfcサーバはもうちょっとファイルの階層がありますので
指定した先がないよ~~ってなっちゃうのです。
ちなみにshokai様が教えてくれたトンネリングは実践したのですが
接続はできませんでした。なんでじゃー。
よくわかりませんが、通路をわざわざつくらなくても
FTPアクセスできるようになったんですかね??
登録:
投稿 (Atom)